
THE BOOBY
BACK TO TABLE OF CONTENTS
B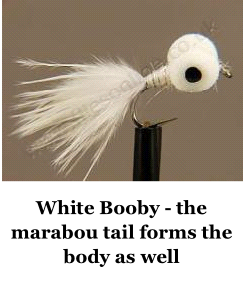 y now you will probably appreciate that the fundamental difference between the booby type of fly and other flies is that the booby is designed to float - and is then used on a sinking line. That is different from a dry fly which is designed to float and is then used on a floating line to keep it on the surface of the water. With the booby, we want it to sink to the bottom of the water and float just off the bottom of the lake or reservoir. This gives us access to fish that are sitting on or near the bottom, which would otherwise be very difficult to approach, because any other method would just keep sinking and disappear into the lake bed.
To achieve this floating ability we use a closed-cell foam as part of the fly's construction. The best place to put this foam is either on the body of the fly or as an imitation of the eye pods that many nymphs possess. Incidentally, the fly that uses the foam as part of its body form is called a razzler although the same construction technique can be used to make a floating fry. These are also effective but are slightly harder to build. The booby also has another advantage because of its construction, and that is its tendency to vibrate as it is pulled through the water. More about this later.
It is important to use a closed-cell foam. This property of each air bubble being totally enclosed means that water cannot penetrate it as it would in a normal bath sponge. So the foam will remain buoyant no matter how long it remains submerged. Closed cell foam is also called plastazote and is available in blocks or pre-cut cylinders from your local fishing store or online. I find that the pre-cut cylinders are too thin for the boobies I like to make and for this reason I prefer to buy the blocks and cut my own cylinders. I have described the method of doing this in the introduction to this chapter. It's amazing how inventive you can be with a power drill in your hand!
A quick word on air pressure would not go amiss about here! When fishing with a booby it is not unusual to fish at depths of 30 feet or more. This is where the fish are likely to be sitting during the coldest and warmest parts of the year and a booby is one of the most effective ways of getting down to them. All well and good. But at a depth of 30 feet the effective air pressure is 2 atmospheres. This means that air will be compressed into only one half the volume it would occupy at the surface. So the air enclosed in the foam in the eye of the booby will also have been compressed. The effect will be to severely reduce the size and lifting capacity of the foam, so it will not lift as much leader and consequently sit a lot closer to the bottom than you would anticipate. Thinking this through means that, as soon as you start to retrieve the fly it may drag along the ground rather than float just above the bottom as we would wish. The answer, therefore, is to make the eyes of your booby much larger than you would initially consider.
I have seen many store bought boobies whose eyes were not much wider than the width of your little fingernail. I make my booby eyes at least the width of my middle fingernail and some of them are a wide as my thumbnail. This will give a lot more volume and thus a lot more lift at those deep points you are trying to fish.
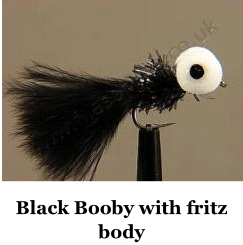 Once you have cut your booby's eyes - match the colour to the rest of your material selection or make them different as a strike point - you will need to get a few bits and pieces together. In this fly we will make a tail, just like in the leech but we will also put an extra body material on the shank. For this I would suggest chenille or fritz, which is a thread with a pile woven onto it. This gives it volume for little weight and comes in many colours, of which I like the lime green for its luminance. You can, of course, use any other body material that comes to mind such as wool, spun hair or a palmered body using a feather - let your imagination be your guide. Alternatively, you can make the body just like the leech pattern we tied earlier and make the whole tail and body out of one pinch of marabou feather. Just remember that we want the finished article to float so don't use anything heavy!
Set a medium length hook with a nice rounded bend, about size 8 in the vise as per normal, i.e. with the point in the vise and the eye pointing horizontally away from the vise. Run a base thread from the eye down to the bend and back up again to just below the eye. Hold the foam cylinder across the shank of the hook and just behind the eye. Now wind your thread up across the foam and down the other side several times in a crisscross fashion. This figure of eight thread should trap the cylinder in place so that it sits above the shank of the hook and at right angles to it. Make sure to pull the thread nice and tight or the foam will move about and loosen. It is best to put a couple of half hitches - as if you were doing a whip finish - behind the foam and furthest from the eye. This will secure that part of the construction, but do not cut the thread. Now run the thread down to the bend in the hook, select a marabou tail and tie it in. This is exactly like the tail we built for the leech and you have the choice of securing the marabou up the entire length of the shank or snipping it off to form just a tail. If you go for the whole body format then you will need to run the thread back down to the eye of the hook again before winding on the rest of the marabou.
Now for the chenille body. As I mentioned earlier, this material is like a nap built onto a thread. Holding the end of the chenille between finger and thumb you can pull off this nap from the last centimetre or so. This reveals the bare thread which you can now lay across the hook at the bend and use a few turns of your thread to catch it in place. Once secure, run your thread up to the eye of the hook and leave it to hang. Wind the chenille onto the shank, making sure that each turns nestles against the preceding one, until you have wound it tight up against the foam cylinder. Use several turns of your thread to catch this in place and finish off with a whip finish behind the foam. Fritz is used in exactly the same way but gives a rougher effect than chenille.
I always use a sparing amount of superglue to hold the body and eyes in place and allow it all to dry before finishing off the fly. When dry, take a pair of curved sharp scissors and snip and shape the two ends of the cylinders into two balls. You will find that they do not exactly match, unless you are very skilled. Don't despair - if you rub the foam quite firmly between your finger and thumb you will make it warm enough to be moulded into final shape. And that's it!
In use this fly will vibrate as the two eyes fight with each other to move through the water. I am convinced that this vibration can be detected by the fish through their lateral line, which is sensitive to changes in water pressure, and is like a signal to them to come and investigate. Having found your booby, they have a tendency to just follow it out of curiosity. I use a reasonably fast figure of eight retrieve to move it continuously through the water. This will drag the booby down lower in the water. This is exactly the motion used by a dragon fly larva to escape any predator and that is just what the booby is designed to emulate. The real creature expels water through its rear vent at high speed to give it a jet propelled means of propulsion. But then I stop abruptly every ten yards or so and allow the fly to start floating up again. This often has a dramatic effect as the trout suddenly believes the fly is about to surface to hatch and the fish will grab it before it escapes! Hold on tight to that rod! If there is no response after a few seconds simply resume the figure of eight retrieve again. This video shows how the nymph is jet propelled.

Just a final word of warning: sometimes this fly may spin as it travels through the water, causing the leader to kink and making an unnatural presentation to the fish. You can always tell when the booby is spinning in retrieve because the fly will spin to unravel the leader when it comes out of the water. This spinning may be caused by the eyes of the fly failing to sit square on the shank of the hook or because they have not been snipped into a round enough shape. It is also possible that the effect may be caused by the eyes being just a little out of symmetry with each other. One eye gets spun around the other due to one being smaller than the other. A little checking at the waterside should cure this by just using your scissors to trim the eyes until the spin is eliminated. Just roll the eyes between finger and thumb to smooth off any jagged edges that may be left after surgery. I have found that it is better to leave the eyes with a slight barrel shape and rounded at the end, rather than trying to make them perfectly spherical. I must admit, though, that some boobies I have made just would not move through the water properly, no matter how much I fiddled with them. For those an early retirement was the only solution, so make sure you always have a few flies to hand rather than relying on just one.
There is another way to use the booby which has become known as the "washing line". For anyone not familiar with it, the idea is to use 2 boobies, on top dropper and point, and to suspend a nymph or buzzer in between. These are either "hung out to dry" at the surface on a floating line (in which case you can probably dispense with the booby on the top dropper and use a second nymph), or sunk on a Hi-D line. Alternatively, with the floating line method you can use a sight bob at the point where the leader is attached to the main line instead of the first booby on the top dropper. If using the hi-d method, it is retrieved very slowly so that the buoyancy of the boobies gets the upper hand and slowly lifts the nymph towards the surface - the idea being to imitate a nymph or pupa ascending to hatch.
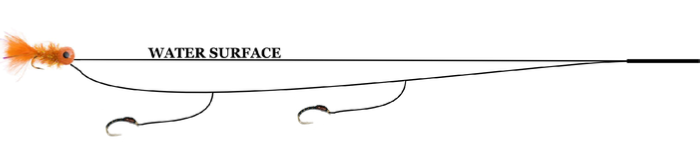
WASHING LINE WITH BOOBY AND TWO NYMPHS
Instead of using a floating line, some success has been recorded using a slow sink line. The idea here is to cast the set-up and immediately to strip back several yards of line. Those 3 or 4 fast pulls cause the floating booby to cough and splutter and pop against the surface of the water, as it resists the slow sink line that is trying to drag it under. The commotion caused by the popping of the booby is designed to get the attention of any nearby fish. Several retrieve methods can be tried. Firstly, a fast strip may entice the fish to chase and take the booby. Alternatively, a figure of eight retrieve can be tried and the booby will continue to sink before sweeping up back towards the surface as the retrieve nears its end. This can imitate a nymph approaching the surface and induce a take. Finally, a slow retrieve may cause the fish to turn away from the booby, only to discover the nymph and take that instead.
Here are two videos I made using the floating line method of a washing line.
Experimentation is the name of the game and you can try putting the single booby on the point or on the top dropper - both techniques giving slightly different presentations. If you tie up your own boobies you might want to try leaving the eyes rough and angular and not neatly rounded. They will then create more of a commotion when initially stripped back. Try coral boobies to emulate a clump of daphnia, cat’s whisker as a fry imitation and try using buzzers instead of nymphs - they all work on their day.
This is Dave Cammiss’s take on the booby which gives a good idea of the methods I have described above.
And here’s another suggestion on how the booby is made.
Enjoy your fly tying and try not to get in too much of a muddle - that’s just a part of the initial learning process - but there is no doubt that a great deal of satisfaction is gained from catching your dinner on a fly you tied up yourself!