
FLY TYING
STEP BY STEP
BACK TO TABLE OF CONTENTS
I have described how to make three relatively simple flies with proven killing abilities. As I keep saying, these are my preferences and you should experiment for yourself to find what works best for you. Equally, there are many, many patterns that are tried and tested and you may decide that you would like to try and build a few of these rather than rely on the store bought versions. This can turn into a hobby in itself, to help while away those long winter evenings when your trout fishing might still be months away.
Each fly is made up of several component parts and mastering the construction of these basic elements opens the door to a limitless variation of flies and lures. So let's take a look at the components one at a time. Remember that virtually all flies start off with a thread wound down the shank of the hook to form a stable base upon which to build the rest of the fly. That base thread can form an essential part of the fly, as in the bloodworm buzzer, or can be covered by another material as in the booby. Either way, it is the starting point of each fly.
While the elements we explore here are not exhaustive - you can always find another way to crack the proverbial nut - they should, nevertheless, give you the basic pointers required to make your flies ever more interesting and creative. Equally, you will come across pictures of flies, or see them in action on the end of another angler’s line, and be able to recreate it or a similar likeness to it with this guide. I have even seen fishermen resort to the use of binoculars to see what the competition is using! But that seems like a competitive spirit taken a little too far for me.
I introduced each element of the construction of a fly earlier and now let’s examine these parts in more detail. I’ll start at the back and work forwards, because the vast majority of flies are built from the back to the front.
TAILS
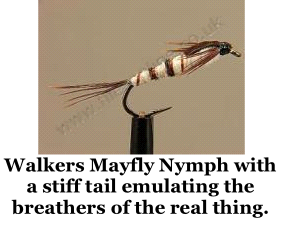 Some imitations try to emulate the living creature exactly, so some tails are quite specific in their construction. For example, a mayfly imitation will demonstrate the three whips that form its tail and will be copied exactly. In this fashion, dry flies rely upon form rather than function, so they are built with the intention of imitating their counterpart. Equally, many nymphs have quite specific tails that are readily identifiable and these too will be copied in the construction of its counterpart. On the other hand, some tails are designed for movement rather than emulation and these will try to copy the undulation of a swimming fish, leech or other creature.
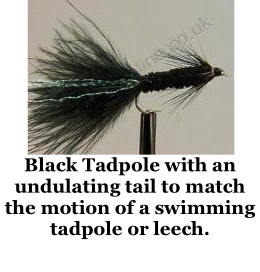 It is important to decide in advance, therefore, what exactly you want your fly to do. An imitative tail will be stiff and resistant to movement so that it will keep its shape and be readily accepted as a copy of the original. The golden pheasant tippet feathers, or a cock hackle are perfect examples of this idea of form emulation. A tail with lots of movement must be made of a soft material which will snake through the water as if it were the propulsive end of a creature. Marabou feather and Arctic fox fur are ideal for use in this manner. The tail should be the first element tied into the fly after the foundation thread has been laid down. Thinking about it, it makes good sense to build the fly from the back forward, so that the tying thread ends up at the front where it can be tied off next to the eye.
When laying down your foundation thread start 1 cm. from the eye and wind it in touching turns towards the eye and then all the way down to the hook bend (this catches in the loose end). The start of the bend is where the tail should be attached. Any further round the bend and the tail will lie unnaturally in a downward plane. Any further up the hook and the shank will interfere with it, especially if you want maximum movement from it. So right at the point where the shank starts its bend is the place to tie in the tail. Having decided what material you want to use, take a pinch of it between finger and thumb, ensuring that it's long enough for your purposes, plus sufficient to take it half way up the shank of the hook. Lie it on the top of the hook and, holding it in place with one hand, wind several turns of your tying thread at the bend and then up the shank to trap the tail in place. If you are using something like marabou this job is made easier by wetting it first so that it does not waft all over the place. I put a little spittle on my finger and thumb and pull the marabou through finger and thumb to achieve this. Once the thread has been wound on you can position the tail properly, untwisting it if necessary before pulling the threads tight. The thread is then wound back down to the bend ready to start on the body.
BODIES
While some flies will have bodies which are simply made of the foundation thread, like our bloodworm buzzer, most will consist of additional layers of material. These additional layers can be anything from slim layers made of strips of material or plastic, to bulky bodies made of chenille or dubbed fur. Dubbing is the technique of trapping short lengths of fur or dubbing material either between two lengths of thread or sticking it to one length of thread with the aid of liquid wax. The dubbing fur is then trapped in place as you wind the holding thread up the hook shank.
Once you have tied in your tail ensure that the foundation thread is back at the bend of the hook again. This will ensure that the tail and body are seamless. Where one finishes the other begins. When using chenille, grasp the end of it between finger and thumbnail and squeeze hard while pulling it through your finger. This will dislodge the last centimetre or so of the chenille material, revealing the core thread. Use this core to trap the end of the chenille with a few turns of foundation thread. The stub of core thread can be trimmed off afterwards. The same method applies to any other single thread body material.
 If you want to try your hand at dubbing, things are a little more fiddly. The easiest way is to smear a little liquid wax down your foundation thread. Place some liquid wax between finger and thumb and run the foundation thread between them. Offer up your dubbing material or cut fur to the waxed thread. The wax will cause it to adhere to the thread. This can be a messy business, but the idea is to temporarily stick the dubbing material to the foundation thread and then, as previously mentioned, wind the thread up the shank of the hook in close loops, trapping the material against the shank as you go. Some thread comes pre-waxed to help things along.
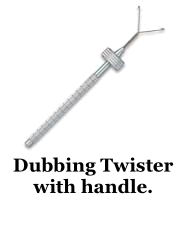 There is an alternative way of doing this using a dubbing twister. Make a loop in your foundation thread. That is simply a case of letting a few centimetres hang down and then wind on a few turns of thread to isolate the loop. The loop should hang down from the shank at the point where you want to start the dubbing. Put the dubbing twister in the lower end of this loop. It's two hooks will hold the loop open at the bottom. Hold the dubbing material between the two threads of the loop as you spin the twister. This will trap the material between the two threads as they are twisted together. This twisted loop is then wound round the shank of the hook in equally spaced turns. It is then held in place by the foundation thread which is also wound up the shank. Either way, dubbing twister or liquid wax, you end up with a very hairy and bulky body.
Thin bodies made of strips of material or tinsel are simply trapped by a few turns of the foundation thread. It is easier to start this operation by making a snip in the tinsel so that it catches in the thread rather than just pulling through. Once it has been trapped by a couple of turns make sure to wind the foundation thread up to the eye of the hook, or it will end up stranded at the wrong end once you have wound on the tinsel. Then wind the tinsel by touching even turns all the way up to the eye of the hook and catch it in again with another few turns of thread. The tinsel can then be trimmed off at the ends.
RIBBING
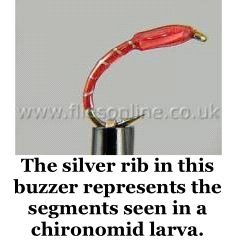 Most aquatic insects have segmented bodies and the idea of a rib is to simulate that segmentation. The added advantage of a rib is that it will give extra strength to the sometimes fragile materials that are used in the body construction. A tinsel or thread might easily get snagged by the first fish that munches on it and start to unravel. A rib will hold it in place and stop it disintegrating. A rib can also add weight to a fly. I use lead wire as a rib on some of my bloodworm buzzers to get them down to the action and keep them down during retrieve.
The secret to a rib is to start it at the same time as you tie in your body material. The body and the rib start off at the same point, but have to be attended to one at a time. If you intend to use a rib trap your rib wire in first, then trap your body material before running the foundation thread up to the eye. In this way the rib wire is left hanging down while you work on the body and the body material will end up hiding the start of the rib. This is why you need two bobbin holders - one for the foundation thread and one to hold the ribbing wire.
There are now many different materials that can be used as a ribbing. Some, as I have mentioned, can be used to add weight to the fly without adding too much bulk. Other materials can add flash or extra attraction. Holographic, Lurex and Crystal threads are just three ideas to add sparkle and life to your creations. The rib is wound up the shank in three or four equally spaced turns and is then trapped in place at the eye by several turns of your foundation thread.
HACKLES
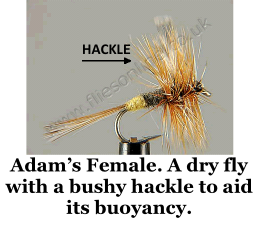 A hackle can serve several purposes, depending on the type of fly being made. It can represent the legs of an aquatic animal such as a nymph; it can suggest the wings as well as the legs in a dry fly; and it can represent the pulsating fins of a small fry fish. To achieve these effects most hackles are normally tied just behind the eye of the hook.
The classic way of creating a hackle is with a single slim feather, normally a cock hackle. After building the body, rib and wing, if applicable, your foundation thread should be hanging just behind the eye of the hook. Take the selected feather 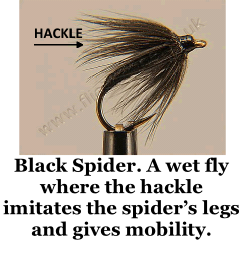 and hold the tip in a pair of hackle pliers. Catch the other end with a few turns of thread to secure it and then wind on four turns of the feather just behind the hook eye. Secure these turns with a few turns of the foundation thread.
If the intention is to create a nymph then the hackle should be trimmed so that only those fibres below the hook remain. Alternatively, all the fibres should be left if creating a dry fly. This will aid in trapping air and give extra buoyancy to the fly. This method creates a stiff hackle, ideal for the imitation of legs and wings.
If, however, the plan is to emulate a fry then movement is 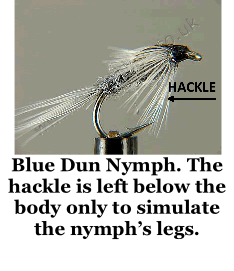 needed and we have to solve the problem in a different way. You will recall that we used a dubbing technique to make a bushy body and we can now use the same method to create a bushy hackle. In exactly the same way as we employed the dubbing twister to make the whole body of a fly, so we can use it to make just sufficient of a loop to create a hackle - the technique is just the same. Use a soft fur to spin the hackle. Rabbit, squirrel or arctic fox are all suitable. Once made, the upper side of the hackle should be trimmed away to leave a highly mobile under-body, simulating the fins of the fry pattern it emulates.
A similar technique to tying in a hackle is palmering, the 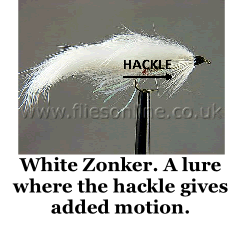 difference being that a palmer runs the entire length of the fly instead of just the head. To create a palmer, first build your body with a rib, but do not complete the rib. Leave the rib wire tied in at the hook bend but untouched for now. The thread should be at the eye end on the hook. Take a cock hackle and secure the end in your hackle pliers. Catch in the end with a few turns of thread just behind the eye of the hook. Now wind the hackle down the shank of the hook in evenly spaced turns until you get to the bend.
Leave the hackle pliers hanging and wind the ribbing wire up the shank of the hook in the opposite direction to the palmer. 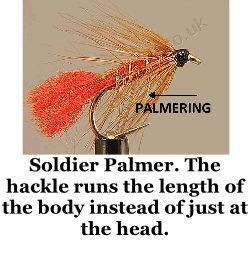 This will trap the hackle in place as the wire passes over the hackle on each turn. Secure the rib with a few turns of thread just behind the hook eye and trim off the excess hackle at the bend of the hook. In some flies a second hackle is applied just behind the eye of the hook as described above. This creates an extremely bushy fly, such as the Soldier Palmer, with both a palmer and a hackle. You should ensure that all hackles are removed from the gape of the hook or they may impede the hook's penetration at the crucial moment. Just snip off these hackles right in the hook bend next to the point but leave the other hackles on the lower part of the shank as they will imitate the legs of the insect hanging below the body.
Here’s a video showing how the Soldier Palmer is made.

WINGS
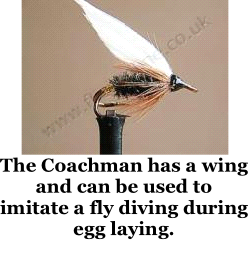
As we discussed in the section on tails, wings can also be either imitative or mobile. It depends on what you want the fly to do. Dry flies will again be imitative, while many wet flies will use the wings to impart extra movement to the fly. One only has to examine a selection of dry flies to see the variety of place and form that can be created with a wing. Some are made with the wings in the up position like a mayfly, while others will trail down the body like a caddis. In the spent form of some flies the wings are splayed out on either side and help to give stability and buoyancy to the dry fly.
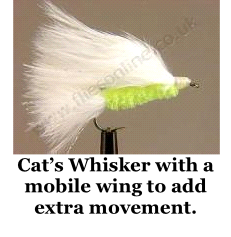 Alternatively a fly such as a cat’s whisker has a wing made of marabou which gives great movement to what would otherwise be a stiff body. Added to the marabou tail this particular fly ends up being all movement, ideal to imitate the fry pattern for which it is used in the autumn.
Whichever you choose, the wing is attached after the body, rib and hackle have been constructed and will normally be placed just behind the eye of the hook. While a marabou wing is easily installed by simply tying in a pinch of material behind the eye, other, imitative, wings require a little more attention.
 These wings are made of two separate sections to simulate the two wings of the fly. Obviously, therefore, we are going to need a right handed wing and - you guessed it - a left handed wing. The secret to getting these two wings to match is to use one feather - duck primary feathers are favoured for their stiffness. Select a feather that will be wide enough to allow you to tie in a slip with enough spare to work with. A slip is one side of the feather from the quill outwards and is cut so that it forms a curve and comes to a point.
If you look at a feather you will see that slips on either side of the quill bend in opposite directions. Carefully snip one slip from the quill and then snip the exact corresponding slip from the other side of the same feather. Hey presto, you have identical wings. Lay one on top of the other between finger and thumb so they curve away from each other and back together again at the points. Tie them both in at the same time. They will separate during construction.
A single turn of thread can be used to keep them apart if necessary. Alternatively, the thread can be wound in different turns to cause the wings to stand upright or splay out horizontally. A little experimentation will soon show this effect. Having secured them, snip off the excess slip poking out from under the foundation thread. A few extra turns of thread will hide this cut end.
HEADS
Many flies will be simply completed with a whip finish, which is then superglued or varnished. This mound of thread effectively becomes the head of the fly. However, there are times when a head can be built to add extra realism to the fly, or to give the fly a particular quality.
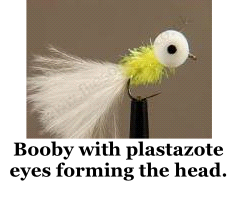 The obvious example of this is our old friend the booby, whose construction is detailed elsewhere. The eyes of this fly are what gives it its buoyancy and we can take this idea to the opposite extreme. The damsel nymph needs to be extra heavy to get down in a fast stream and we can achieve this by tying in weighted eyes instead of our plastazote tube. These weighted eyes look like a tiny pair of dumbbells and are available from most suppliers.
I have experimented with the best time to tie in the eyes and my experience is that the eyes should be the first part of the fly to be built once the foundation thread has been laid down. While this is a contradiction to my previous assertion that you should build your fly from the back forwards, building the eyes first will not get in the way of the rest of the construction and the tying thread can be run down to the hook bend once you have the eyes in place. Offer up the eyes just behind the eye of the hook and secure in place with a series of figure of eight turns. Run the foundation thread down to start the tail and leave it hanging. I take this opportunity to superglue the eyes in place and leave them to dry. Alternatively, you can snip off the foundation thread and glue the eye in place, leaving it to be finished at another time.
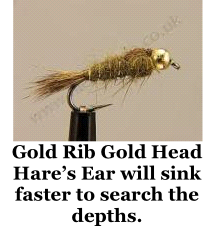 A bead head should also be attended to before anything else. A bead includes the gold heads, as well as silver, blue, red and just about any other colour you can think of. The bead needs to be threaded onto the hook. If we have already added bits and pieces to the hook then it becomes impossible to put the bead on. The temptation is to just thread the bead on the hook and carry on making the rest of the fly. This will leave the bead free to rotate and will inevitably fray the thread next to it leading to the rapid demise of your fly. You might want to look at this video of the making of the GRHE to help you along.
Before threading the bead onto the hook, I like to lay down six or so turns of thread right next to the hook eye and do a whip finish, snipping off the thread. Put a touch of superglue onto this layer of thread. Now ease the bead onto the hook and onto this layer of thread. Leave the superglue to dry and the bead will be permanently positioned. Build the rest of the fly in the normal way, but the final whip finish should be completed behind the bead. Some beads have a hollow on one side and you should ensure that the hollow faces away from the eye or else the eye will disappear into the hollow making it almost impossible to tie the fly to your leader.
The other head that is popular is the deer hair head as used in the muddler and razzler. Strangely, these two flies are used in exactly opposite ways. The muddler is pulled across the top of the water as an attractor and is often used on the top dropper of a team of three. The razzler, on the other hand, is used like a booby on a fast sink line, but the buoyancy of this fly comes from a closed cell foam body that is torpedo shaped with a hole down the centre through which the shank of the hook is inserted and then glued in place.
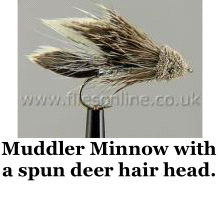 This muddler type head is made by taking a bunch of deer hair and catching it loosely with two turns of foundation thread. Once it is in place slowly pull the thread tight and the bunch of hair will flare and rotate as it is trapped against the shank of the hook. Repeat this process as many times as you need to build a bushy head. Once you are satisfied with the bulk of the head you should use a very sharp pair of scissors to snip the head into shape. The forward facing hairs will be trimmed right back to expose the eye of the hook, while the rear facing hairs should be left long to sweep over the back of the fly. The overall effect desired is a ball shape with the eye of the hook just poking out of the front.
The effect of this rough bushy head is to cause a great deal of disturbance in the water. While the effect of this is obvious at the surface, what is not so obvious is just how much disturbance it can cause at depth. That disturbance will be detected by the trout along its lateral line which is primed with thousands of pressure sensitive cells. It is these cells that we want to stimulate, making the fish think that a creature is in distress. Having caught wild trout up to nearly twenty pounds on a razzler with a bushy deer hair head I can verify just how effective it can be.
Equipped with all the ideas of how each part of the fly is constructed you can develop these basics into an endless variety of dries, wets, nymphs and lures to fit exactly what your particular requirements are for any situation you encounter. And that’s part of the fun - finding your own solutions to each individual problem.