FLY LINES 2
BACK TO TABLE OF CONTENTS
Line Types
Floating Lines
Intermediate Lines
Fast Sink Lines
Skagit Lines
 So we come to the express trains of the fly line collection. These lines are made of a dense material bonded to a monofilament or braid core. They are much thinner than other types of fly line as it is easier to make materials that are dense and sink quickly than materials that float or sink at a slow rate. This thinner cross section means that these lines offer less resistance to the air and therefore can be cast greater distances at greater speed. This is a useful feature when fishing in very windy conditions when the line is likely to be blown about.
Fast sink lines are ideally suited for use in deep water with a buoyant fly such as a booby or a razzler. I have been privileged to catch over a dozen double figure trout using these lines and flies. The intention is to attack those fish which are feeding on or very near to the bottom. There really is no other way of keeping a fly so very close to the bottom of the lake or reservoir without the risk of it grounding out or disappearing into the mud and detritus down there. You have great control over the speed of retrieve and some anglers will just leave a buoyant fly on a hi-d line static with no retrieve whatsoever for long periods of time in the hope that they may ambush a passing fish.
The hi-d line and buoyant fly system is an absolute giant killer in the right circumstances. I know of some anglers who use no other technique than this - and with good results, but I think they are missing some of the finer ways of catching dinner, like a fine dry on a lovely summer's evening. As always, it's horses for courses.
The counting system described in the chapter on intermediate lines comes into play with these lines as well, but for a different reason. With an intermediate line the idea is to start the retrieve when the line has fallen to a depth where it can be retrieved in full just before it hits bottom. With a buoyant fly and a fast sink line (sometimes referred to as a high density or hi-d line) the object is to ensure that the fly is as close as possible to the bottom when it is retrieved. The count system here is to ensure that the line has reached bottom before the retrieval starts. Knowing the depth of water and the sink rate makes it easy to ensure that you give enough time for the line to fall to the bottom before you start the retrieval.
The temptation is to then use a nice comfortable figure of eight retrieve (explained in the Winter Chapter) to get the booby moving along close to the bottom of the lake or reservoir. But things are never quite what they seem. While the movement of your fly may well attract a fish, they will often follow it out of curiosity but not take it. We have to do something to induce the fish to seize the fly and there are a couple of things we can do to make the fly more attractive to the fish.
Few creatures that trout feed on will move sedately along the bottom if they know that they are perilously close to their last moments with some monster stalking them. They are more likely to dart and dive to try and avoid their date with destiny. We can make our fly imitate this action. Instead of a continuous and regular figure of eight retrieve try a few seconds of short fast jerks to bring back the line. These fast jerks will often get an immediate result. Always make sure you have a good hold of your rod - some of the takes can be savage! Here is my video showing a hi-d line and booby in operation.

To help put even more realism into the retrieve, here's another idea. There is one time a nymph cannot help but answer the call of nature and that is when it is time for it to leave the water and start its life in the open air. This will involve the nymph in a perilous journey to the surface, but the first movement it makes is when it leaves the bottom and heads for the top. We can simulate this initial upward motion by simply doing nothing! A fast figure of eight retrieve for a few moments should then be followed by a couple of seconds when you stop and do nothing but hold on tight. The fast initial retrieve will drag the booby down close to the bottom. This wait then gives time for the booby to start rising in the water due to its inbuilt buoyancy. It's amazing how effective this stop-start method can be and has bagged me some huge fish. Nothing gets the adrenaline going more than seeing your rod tip suddenly bury itself in the water when you stop retrieving!
I showed this technique to a newcomer I was giving some lessons to. He was retrieving like mad to show off the figure of eight I had just taught him. I told him how impressed I was and then told him to stop and have a rest. As soon as he stopped, his rod was nearly jerked out of his unsuspecting hand as a trout grabbed the booby. A real tussle ensued, which involved the line getting wrapped round the anchor rope and several other adventures, but we eventually landed him a fine eight pound specimen. Not bad for your first ever trout on your first ever trip! And all because he just stopped!
There is another method of fishing where the hi-d line is the tool of choice and that is in the method known as back drifting. A time will come when nothing you have tried has produced any results and you are beginning to think that they must have removed all the fish since your last visit. This can happen on those long hot afternoons when the fish have gone deep and casting a line into forty feet of water is not terribly appealing. The answer is to pull up the anchor and let the breeze move the boat across the water with your hi-d line and booby being dragged through the depths behind it. Bear in mind that this system will only work with a buoyant fly like a booby or razzler.
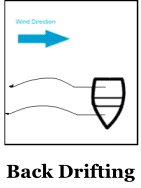 Where you would normally sit in the boat with the wind at your back, here you sit with the wind in your face so that your back is to the direction of travel. Flick your line and booby out and then gently pay out line as the boat moves through the water until you think the line has touched bottom. This will be much more line than you would initially expect as you have to take into account the amount of line needed to make a comfortable angle of travel from the bottom to the top of the water. Then just sit back and relax. The fly will fish itself and the only time you have to bring it back in is when you reach the other side of the reservoir - but keep an eye on where the boat is headed!
A further refinement to this method is to add some droppers to your rig. Normally, this system uses two boobies – one just a few feet from the bottom and the other maybe eight or ten feet above it. The idea is that the bottom booby imitates a slow-moving nymph and the higher booby looks like a clump of daphnia. The bottom booby could be black and green, brown or a similar nymph like colour. The higher booby is usually orange or coral to suggest the hue of the daphnia – I make up a large orange mop fly booby (made from a piece cut from a hand mop used for polishing cars). Use a large booby for the higher fly so that it can support some extra weight. In between the two boobies add an extra couple of droppers. One can be a buzzer and the other can be a gold ribbed hare’s ear – or whatever you think will work. Hey presto – you’re now fishing nymphs and buzzers at depth with ease!
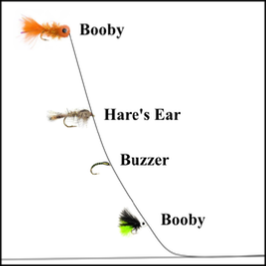
Back drifting boobies with droppers
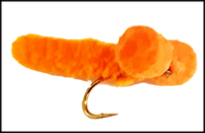
Mop Fly Booby
If, however, you decide that you would prefer some active participation in your fly fishing then you can use the hi-d line in the same way that you would use an intermediate line. There is the added proviso that you must be anchored over very deep water to make the system work. It's a hot summer afternoon and any self respecting trout will have sought the deeps to while away the time before the sun moves off the water and the shallows become inhabitable again. While down there it is likely that the fish will mooch around hoovering up any odd morsels that it comes across.
Surprisingly, some flies prefer to lay their eggs over deep water and the resultant larvae will live in these deep areas. We can put a set of bloodworm or buzzer imitations on the hi-d line and cast them out into this deep water. Remember to pull out a good deal of backing to allow for the depth of water. This extra line will slowly submerge as the line sinks. Without this extra line your flies may never reach the bottom and the system won't work.
Now, let's say the water is forty feet deep. It will take a line rated at six inches per second some eighty seconds to sink to the bottom. But we don't want to allow the flies to just sink into the bottom detritus. So we start retrieving at, say, thirty seconds and, if we get the timing right, the flies will just brush the bottom before starting the upward journey back to the surface. Retrieval must be very slow - bloodworms are not noted for their turn of speed! I remember one old wag who used this system and would comment that his retrieval rate was "about an inch an hour". I think you can actually go a bit faster than that!
Examine the flies for any mud indicating that they hit the bottom and adjust your timing accordingly. Takes may come at any time from the flies reaching the bottom, right up to the surface. I have had many times when the fish have apparently followed the flies right up to the surface and taken one just as I was about to lift off. I liken this to a gathering exercise. The fish may have become interested some forty feet down and that is where I gathered the following fish. But it takes that entire ascent for the fish to decide that it will take the fly.
The natural assumption is that fast sink lines can only be used in deep water. As always, there is an exception to this mantra. When the fish are feeding on fry and I am pulling a lure to imitate an escaping fry fish I will use a hi-d line even in shallow water. The reasons are several. Firstly, a weighted line will keep the fly down in the water, whereas a slow sink or floating line will just make the fly skim along the surface when you really need it several feet down where the action is. Secondly, a weighted line will give you greater casting distance which means you don't need to get too close to the feeding fish and run the risk of spooking them. Finally, a hi-d line can be made into a shooting head which is much easier to use and will give even greater distance. Because lure fishing is not depth sensitive, the use of a line that gives greater distance is an advantage. With many techniques it is essential to have the right depth and retrieval rate every time. That is not the case here.
There is one other type of fast sink line that is unique in its construction. The lead core line is exactly that - a core of lead wire surrounded by a braided sleeve. This sleeve helps to avoid the kinking that this line can suffer from. It is much shorter than a normal line, usually only about twenty feet in length. The lead core is very pliable, prone to tangling and difficult to handle. Why then, you might ask, would anyone want to use such a beast? Well, it really does sink like a stone which is useful in very deep waters.
 The great danger of a lead core line is that you are unlikely to find a rod that is capable of casting it - it falls outside of the AFTM ratings system. You are more likely to end up with a rod in several more pieces than it should be if you try to cast this line repeatedly. If you do acquire such a line then please do NOT try and cast with it. At best you will break your rod and at worst take your own head off! The way it is used is on the drift or under oars where permitted, when it is paid out behind the boat to search the great depths that are required for hunting big browns and lake trout. It's a bit like the back-drifting system where a booby is employed - see the Boating chapter. The difference is that with this technique the amount of line that is paid out is only sufficient to take the fly down to the desired fishing depth rather than all the way to the bottom. It is often used with a big tube fly or similar to imitate an injured fish - a tempting food item to these highly carnivorous creatures.
This type of fishing is called fishing "off the rudder". As the boat drifts an oar, or a purpose made rudder, is used to control the direction of drift in order to follow a particular depth of water. In a strong breeze the speed of drift is likely to force a normal hi-d line up in the water. The great weight of a lead core line counteracts this and keeps the fly down in the deeps where the fish are lurking. Some manufacturers have now introduced an environmentally friendly version of this line made with tungsten instead of lead.
Skagit fly fishing is a popular method of fly fishing that originated in the Skagit River in Washington State, USA. This style of fly fishing typically involves the use of a shorter, heavier fly rod (typically between 10 and 12 feet in length) and a Skagit-style fly line, which is a short, heavy line designed to cast large, heavy flies and sinking tips.
Skagit fly fishing is particularly effective for fishing in rivers with heavy currents and deep pools, where traditional fly fishing methods may not be effective. With Skagit-style fly fishing, the weight of the line helps to load the rod and create the necessary power to make long casts, even in challenging conditions.
One of the key aspects of Skagit-style fly fishing is the use of spey casting techniques. Spey casting involves using both hands to cast the fly line, allowing for longer casts and more precise placement of the fly. This technique is especially useful in tight spaces, such as narrow river canyons or dense brush along the riverbank.
Skagit fly fishing is a versatile method that can be used to catch a variety of fish species, including steelhead, salmon, and trout. It is also a popular style of fly fishing for anglers who prefer to fish with two-handed rods and who enjoy the challenge of casting heavy flies and sinking tips.
There are several types of Skagit fly lines available on the market, each with its own unique characteristics. Here are a few examples:
Airflo Skagit Compact: This Skagit-style fly line features a short, powerful head that is designed for casting large, heavy flies and sinking tips. It is a popular choice among steelhead and salmon anglers.
Rio Skagit Max: This Skagit-style fly line has a short, heavy head that is designed for casting big flies and sinking tips. It is also available in a variety of densities to help anglers adjust to different water conditions.
Scientific Anglers Skagit Extreme: This Skagit-style fly line features a short, aggressive taper that is designed to turn over heavy flies and sinking tips in tight spaces. It is a popular choice for fishing in smaller rivers and streams.
OPST Commando Skagit: This Skagit-style fly line is designed for use with ultra-short, lightweight rods. It features a short, heavy head that is easy to cast and helps anglers deliver flies with accuracy and precision.
Guideline Power Taper: This Skagit-style fly line features a short, heavy head that is designed to load fast-action rods and deliver large, heavy flies and sinking tips. It is a versatile line that can be used in a variety of fishing situations.
These are just a few examples of the many Skagit-style fly lines available on the market. When selecting a Skagit line, it's important to consider factors such as rod length and weight, fishing conditions, and personal casting preferences.
Using a Skagit fly line requires a specific casting technique called Skagit-style casting, which is similar to spey casting. Here are the basic steps for using a Skagit fly line:
Choose the right rod: Skagit-style casting requires a specific type of rod, typically a two-handed rod between 10 and 12 feet in length. Choose a rod that is appropriate for the type of fishing you plan to do and matches the weight rating of your Skagit line.
Attach the line to the backing: Securely attach the Skagit fly line to the backing on your reel.
Attach the leader: Attach a leader to the end of the Skagit line using a loop-to-loop connection or other knot.
Load the rod: Hold the Skagit line and leader in one hand and the rod in the other. Position the line and leader so that the end of the Skagit line is just outside the rod tip. Use a roll cast or other technique to load the rod with energy.
Make the cast: Using Skagit-style casting, make a forward cast by sweeping the rod tip down and out, then bringing it back up and forward. Release the line at the right time to send the fly out to the target area. Practice casting to develop your technique and achieve the desired distance and accuracy.
