FLY LINES
BACK TO TABLE OF CONTENTS
Line Types
Floating Lines
Intermediate Lines
Fast Sink Lines
Skagit Lines
The fly line is what sets fly fishing apart from all other methods of angling. In other forms of fishing, the bait or lure is cast using some type of weight with a monofilament or braided line. In fly fishing it is the weight of the line itself that provides the motive force to propel the fly through the air. The fly line has to have a certain amount of mass to carry out this task. This means that the fly line is not going to be inconspicuous in the water, so a length of ordinary fishing line is attached to the front end of the fly line to put distance between the fly line and the fly. This normal piece of line is called the leader, which is so important that it deserves a whole chapter to itself.
Fish live in a 3D environment - they can go up and down in the water column as well as moving from place to place. We need to find a way to present our fly at the same depth as the fish. It is the fly line that helps us solve this problem. By manufacturing the fly line out of different materials it is possible to give the line a specific rate at which it sinks in the water. This quality of a fly line is called - unsurprisingly - its sink rate. If you see fish splashing around on the surface then you don't want your line and fly to sink like a stone when it enters the water so that you end up fishing underneath your quarry. Equally, if you suspect that the fish are sitting deep then you need to find a way to get your fly down to them.
In the chapter on Rods we discovered that the best relationship is created when the rod, reel and fly line all carry the same AFTM rating. This means that the weight of the line is matched to the power of the rod and the carrying capacity of the reel. Consequently, the first thing to ensure is that the fly line you purchase is the same AFTM rating as your rod and reel. All well and good. But we need a lot more control over how fly lines behave than just their weight, so the next thing to understand is that they are manufactured in three separate categories. Floating lines do what they say and sit on top of the water. Intermediate lines will sink slowly through the water for use in shallow waters or when the fish are sitting high in the water column. Fast sink lines will sink very quickly to get your fly down in the water when the fish are sitting deep or right on the bottom.
That all sounds pretty straightforward but, of course, it's never quite that simple! In fact there are many lines manufactured and they all have differing characteristics. Not only that, it is also possible to adopt different fishing techniques with the same line - for example, fishing deep with a floating line as well as the more obvious surface fishing technique. We'll address these different methods later. One of the leading fly line manufacturers is called Rio. Here is an excellent video showing just how they make their fly lines.

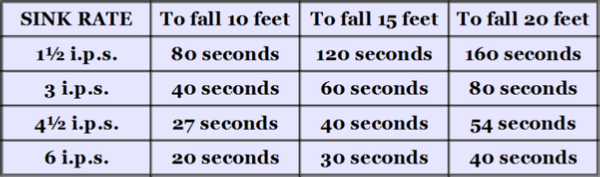
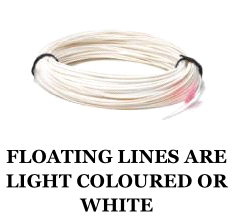
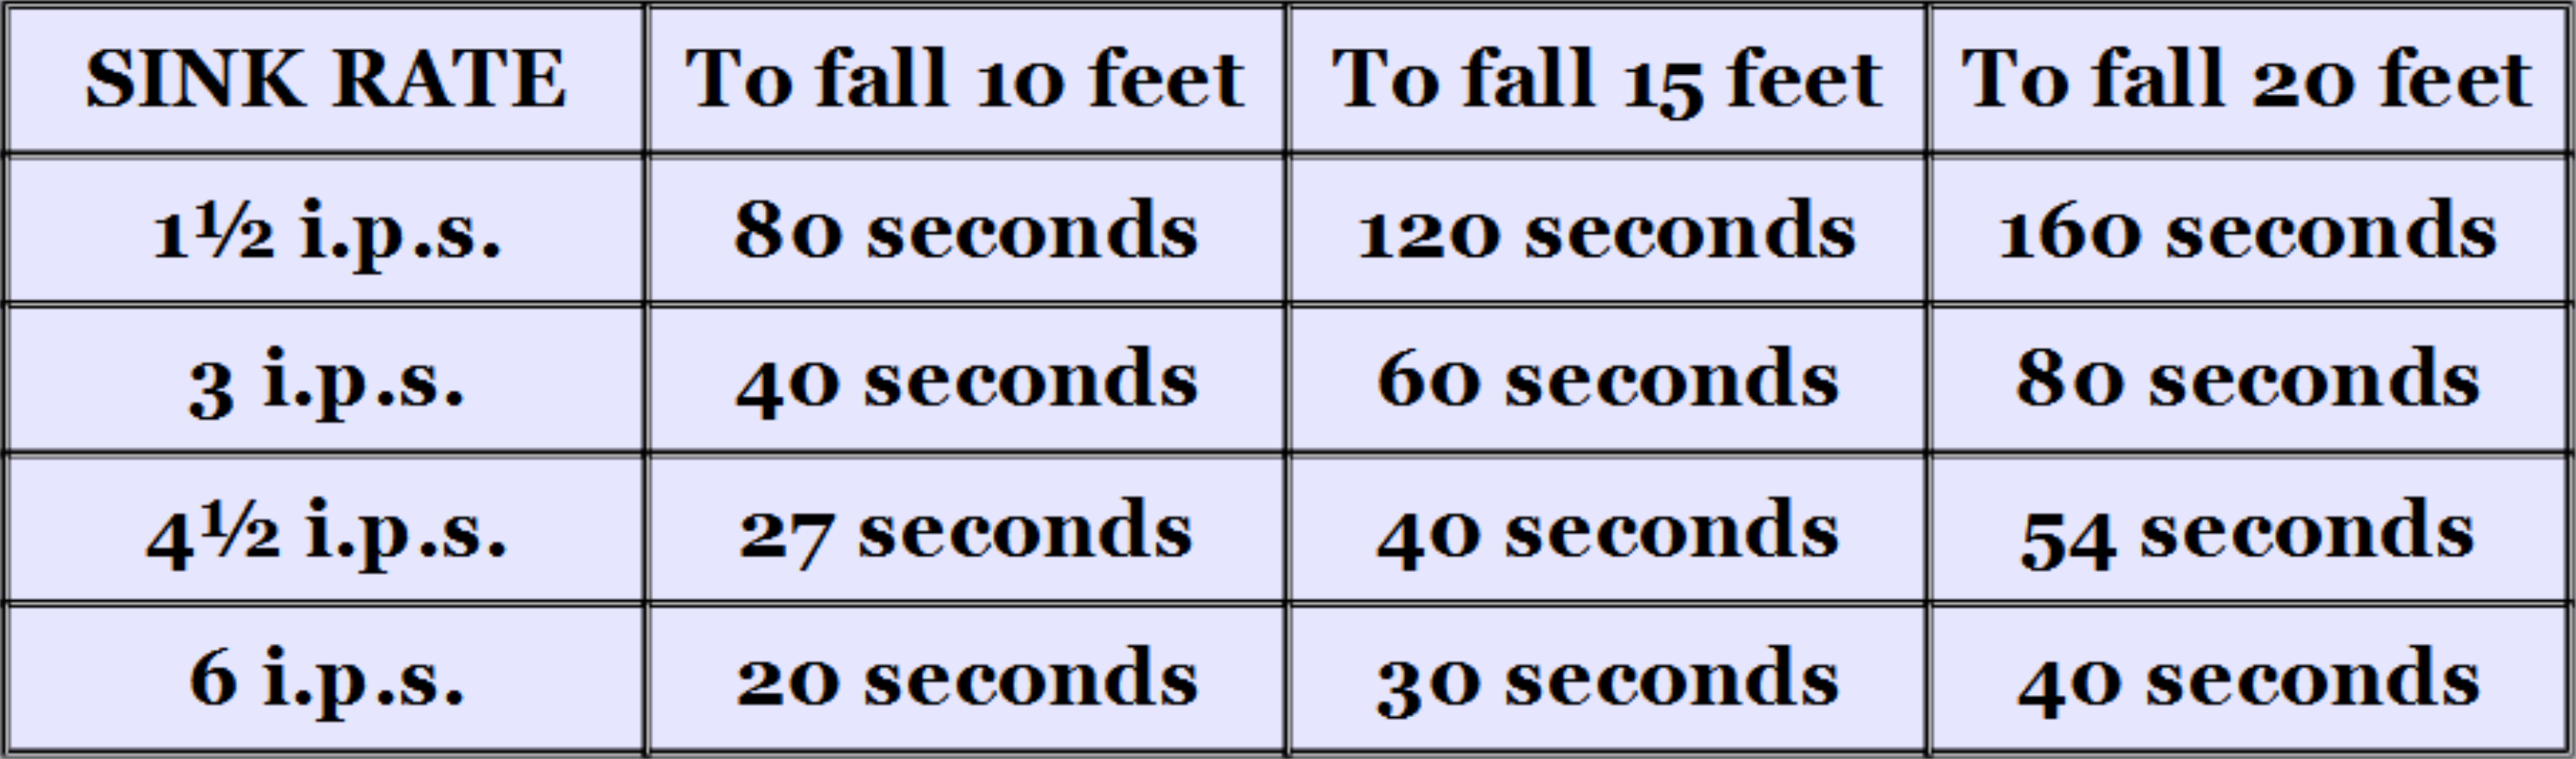
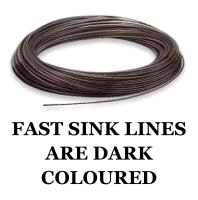
O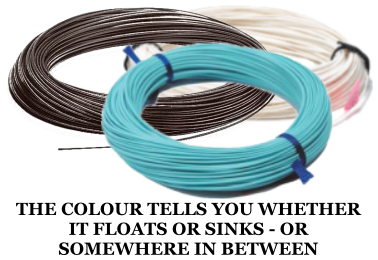 nce you have installed a line on your reel - the Reels chapter details shows how to do this - how are you going to tell if it's a floater, intermediate or fast sink? Fly lines are manufactured in different colours and the rule of thumb is this: the lighter the colour of the fly line, the slower it will sink. Floating lines are usually white, bright orange or yellow. Slow sink lines (also known as intermediate lines) are manufactured in light green or light blue, while the fast sink lines are made in dark colours such as dark brown, dark green or charcoal. When fishing in ten feet of water a line that sinks at the rate of six inches per second will hit the bottom after twenty seconds. This is hardly enough time to retrieve a full length of line; but a line that sinks at only one and a half inches per second will take eighty seconds to fall the same distance through the water, giving much more time to effectively retrieve the line and flies. It is important, therefore, to ensure that you are using the right line for the depth of water that you intend to fish.
The following table gives an idea of what depth will be achieved by different density lines for a given period of time. It is really important that you get used to these differences in sink rates - it will ensure that you use the right line for the depth of water you are attacking. It's pretty easy to work out how long your line will take to fall through a given depth of water once you get the idea.
(i.p.s. = inches per second)
Experience will show you that different flies are best used with the appropriate fly line - we'll look at that problem later and try and match up the fly to the line. Nothing is cast in stone and you should always be prepared to experiment with your fly fishing - all the suggestions here are from my own experience and it's up to you to find what works for you.
From the above table you can deduce that many methods of fly fishing are dependent upon getting your line and fly down to where the fish are. This time critical element is quite different to many other fishing methods which are much more "chuck and hope". Indeed, a lot of fly fishermen use a stopwatch or their wristwatch to time the line down through the water. I found after several years that I was counting down without the use of a watch. My count might not exactly equal the same number of seconds because I was not counting at the rate of one a second. Nevertheless my count rate was always the same so I became accustomed to knowing what depth my line had reached.
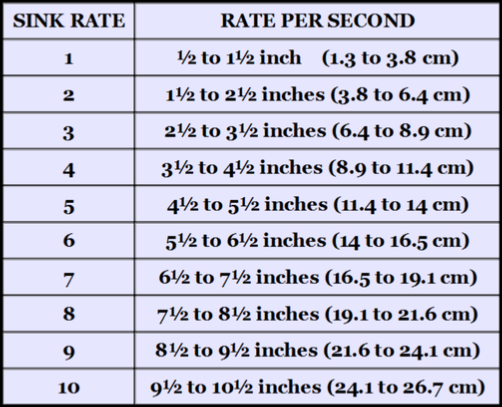
There have recently been moves afoot to introduce a new rating system for sinking lines to overcome the confusion about what is an intermediate line and what is a fast sink line. This has resulted in lines being given rating numbers to reflect the speed at which they sink through the water. The table below gives these details, but it should be remembered that only some of the lines available have adopted this new rating system.
This rating system also applies to sink tip lines which are explained later in this chapter. I wouldn't be too worried about getting the exact sink rate you think you need, as all fishing techniques are open to your own interpretation and a line that sinks just one inch faster or slower is not going to make a huge difference to the way the flies are retrieved. Nevertheless, this new system is a much better idea than just calling a line fast sink or intermediate.
SINK RATES
So far, so good. We now know what density lines there are and what they do. But it doesn't end there. It is possible to manufacture a fly line with different characteristics other than its sink rate. For example, some lines are made to cast great distances, while others are made to alight very gently on the water to avoid spooking a surface feeding fish. We now have to work out which ones are which and what you should look for.
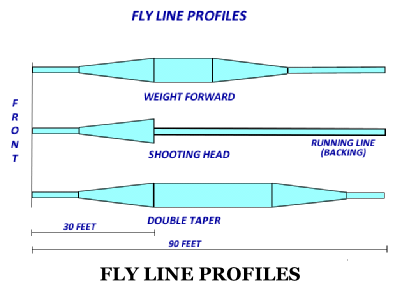 Because fly lines must have mass to enable them to fulfil their function of casting the fly, it follows that we can vary the mass to change the sink rate. We can also vary where along the line we put that mass to change its casting qualities. In other words, we can make the line thicker or thinner to adjust how it behaves. The most obvious line is one that has a uniform thickness from start to finish. This is known as a level line. It casts like a brick, has few applications for everyday use and is not generally available. So if the answer is not to have a uniform diameter throughout the length of the line, then what are the alternatives?
If we want to cast the line a goodly distance then it makes sense to put a good deal of the mass at the front end of the line where it will be most effective. This, unsurprisingly, is called a weight forward line. Most of the mass is concentrated in the first forty or fifty feet of line, meaning that maximum power is achieved with only part of the fly line airialised. The rest of the line will shoot out when the line is cast. This idea is taken a step further by doing away with the thin back end of the line - called the running line - and attaching this shortened line directly to the backing line. This is called a shooting head and is identifiable by the fact that it is only a third of the length of a normal line. The third type of line in common use has a thin front end and then a uniform thickness for most of its length followed by a thin back end. Because this line spreads its mass over a greater length, it will not cast as far but can be used for delicate presentation at close quarters, making less of a splash as it lands. Because it is thin at both ends it is called a double taper line. The best way to understand the differences is by looking at the diagram, which shows the relative diameters of each line. Now let’s explore these lines in more detail.
WEIGHT FORWARD
Having already decided that it is the mass of a line that is essential in making it cast, it would seem to make sense to put the greater mass of a line at its front end where we are going to use it. As mentioned above and not surprisingly this is known as a weight forward line and it is the line that most beginners will find easiest to get along with. A normal fly line is about ninety feet long and in a weight forward line this extra thickness will be concentrated in the first third of the line. In practice, there is a short length of thin line before you get to the thick part - this helps reduce splash when it hits the water and aids in turnover (the straightening of the line and leader as it lands on the water).
So a weight forward line has a short thin front end of about two or three feet which then thickens to a belly of about thirty feet before tapering down to a thin running rear line of about another sixty feet. If you forget what line you have on a reel it is a relatively simple task to pull off about ten feet of line and compare that part of the line to the front end of the line. If there is a noticeable difference in thickness between the two pieces then it a safe bet that you have a weight forward line on the reel.
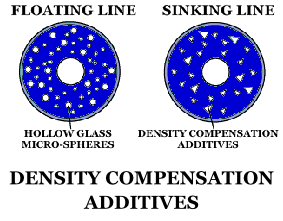 There is one inherent problem in distributing the weight of a line at different places along its length. The thicker line will tend to sink more quickly in the water. This means that a weight forward line will sink more quickly along its thicker belly, which will cause a bow to form in the line as it sinks through the water. This would stop the line sinking through the water in a uniform manner. The heavier front end would race down while the thinner back would struggle to sink. Fortunately for us, the clever people who manufacture fly lines identified this problem and now manufacture lines which vary in density as well as thickness. The thinner backing line is made slightly denser so it can keep up with the thicker belly. This feature of a sinking fly line is called density compensation. All good sinking lines are now density compensated. But beware of cheaper imitations, they may not possess this specialised feature.
SHOOTING HEAD
If we like this idea of having the mass at the front end of a line to assist us in casting a great distance then we can go one step further. After the thick part of a weight forward line, we can replace the rest of the line (called the running line) with something even lighter - for example we could just start the backing at that point. And that is exactly what a shooting head line is. This line will give maximum casting distance. Most manufacturers make shooting head lines and these are easily identified by their short length and the change from fly line to backing line built as one continuous length. Density compensation is not necessary as the weight of the short heavy front end will drag the ultra light backing down behind it.
It is quite possible to make a shooting head line yourself by cutting a weight forward line down to size. Take a normal weight forward line of ninety feet and measure off the front thirty five feet. Then cut the rest off! It sounds drastic, but that is how a shooting head is made. The shortened fly line is then attached to your backing line in the normal way. Remember that this shortening of the line means that you will have to compensate by putting on extra backing (see the chapter about Reels).
There is one important point to bear in mind when making up a shooting head. Remember that we want the rod, reel and line to work together for maximum effect - hence the AFTM rating we have previously discussed in the chapter on Rods. But we have just cut off and discarded a large section of our fly line. The part that we are going to use will be too light for the rest of the kit. To compensate for this we must start off with a slightly heavier line in the first place. The rule of thumb is this: start off with a weight forward line of one AFTM rating higher than the rod you are going to use. If you are going to use a rod with an AFTM rating of 7 then you should use a weight forward line with an AFTM rating of 8 to convert into a shooting head.
It is possible to purchase a shooting head with a backing line already attached as an integral package but I prefer to make up my own. If you do it yourself you can experiment and start off with a slightly longer shooting head, say thirty eight feet and take it fishing. You need to get the whole shooting head and a few feet of the backing airialised before you can properly shoot it. You may find that thirty eight feet is just a little too much to airialise comfortably. If so then chop off a couple of feet and try it again. This way you can find the ideal length for you and your rod. It all sounds a bit fiddly having to chop a bit off and reassemble it again, but I promise it will be worth it in the long run. Trying to use a line that is slightly too heavy or light can become uncomfortable and overtiring. Shooting heads demand a different casting technique which we'll learn in the Casting Chapter. It is the easiest line to cast and it is by far the best way to introduce yourself to the sport, without spending hours and hours just trying to cast a line a reasonable distance. Remember, the object of the exercise is to catch some fish - using a shooting head to start off with makes the casting part of the adventure so much easier until you get more confidence.
Shooting heads are one of the most useful lines for the type of fishing where the maximum amount of water needs to be covered. In fact, I have successfully used shooting heads in both fast sink and floating line formats. Where they do not hold up is when you wish to fish at a specific depth using an intermediate line. If you think about it, the point of using a shooting head line is to get more distance from the cast. But the point of using an intermediate line is to get accuracy in depth control. In that situation there is little to be gained by distance casting as your fly will reach bottom before you have retrieved it.
But wait, you say, doesn't that apply to a fast sink line too? And here's the secret - with a fast sink line use a floating fly! I don't mean a dry fly, but one that will float - the line will pull it down, where it will float at the end of the leader and just off the bottom. You can adjust how much off the bottom by your leader length. I have caught countless numbers of fish using this method, primarily with a fly enticingly called a "booby". Take a look in the Flies chapter for more information. The other time using a fast sink line made into a shooting head makes sense is when the trout are fry feeding and you want to use a lure. Even in shallow water the lure can be cast a great distance and retrieved at high speed long before it has fallen to the bottom. Those long pulls on the line have the effect of holding the fly up in the water as well as getting it back in double quick time.
DOUBLE TAPER
The final type of fly line that you will come across in everyday usage is the double taper line. This line is useful when fishing at close quarters, for example on a stream, where the aim is to cast accurately over a short distance. This line has a short thin section at the front and back ends with a slightly thicker uniform section through its main body. It is quite possible to use this line and reverse it front to back when it starts to show signs of wear - something that is not possible with a weight forward line. Because this line is thinner through its main section it makes a much smaller splash when landing on the water. This obviously is a great advantage when fishing at close range and you are trying to avoid spooking the fish, but the trade off is that it does not cast great distances like a weight forward line.
To sum up, lines come in distinct characteristics of sink/float abilities - identified by their colour. They are made in different AFTM ratings to complement the rod and reel you are using. They also have different casting qualities - distinguished by their name. All this information is neatly summed up on the box by a simple code. For example, a weight forward floating line that is suitable for an AFTM 7 rod will be coded as "WF-7-F". The rate at which a line will sink in the water will also be declared, usually in inches per second. This piece of information is vital when calculating if your line - and therefore your fly - is in the fishing zone (where the fish are). The very fastest sinking lines sink at around six or seven inches per second, while intermediate lines can sink as slowly as one inch per second. There are other lines with special uses - such as sink tip lines - but you won’t need to worry about those until you become more experienced.
Now let's look at each type of fly line in more detail and work out how to put each one to best use. As we have discovered, each type of line can come in several formats, so what is described in the next section will apply equally to the weight forward, shooting head or double taper forms of each line.
Remembering our colouring rule for lines, a floating line is normally white, yellow or a similar very light hue. Obviously, floating lines are useful in shallow areas where a sinking line would take the flies to the bottom before we have time to make them work. With a floating line the flies are normally kept high in the water enabling us to tackle those areas where the fish feed on the margins of the lake or over the tops of weed beds. Equally, a floating line will enable us to attack those shallow rills and streams which at times are measured in depths of only a few inches, but which can harbour wonderful sport. I had a great time fishing in no more than eighteen inches of ice cold water for grayling on a trip to Alaska. With a short leader and a buzzer or similar pattern there is great sport to be had in these fast flowing waters.
Fished with a dry fly, a floating line can be the only successful method of attacking crystal clear rivers and the English chalk streams that are so famous. Indeed, on some of these waters a floating line with a dry fly is the only permissible method of fishing. But there is more to a floating line than just fishing the top few inches of the water, as we shall see later. For many the floating line and dry fly is the only way to fish - they call themselves the purists - and there's no harm in that.
 When fishing a floating line on moving water there is one extra problem that has to be overcome, and that is line drag. Careful examination of a flowing river will show that the water does not flow at a uniform rate across the whole width of the river. There will be areas, usually in the middle, where the water flows faster, whereas the water at the margins will tend to move at a more leisurely pace. When casting across this river, your line will be in contact with both the faster and slower water. This will cause the faster moving parts of the line to try and "get away" and drag the slower moving line behind it.
This drag means that the flies will not move through the water in a natural manner, rather they will be pulled along in the wake of the faster moving parts of the line. This will look very unnatural to any inquisitive fish which will see flies sitting on or in the water, apparently travelling faster than the water itself. In the worst cases of drag, the flies will be pulled across the water and appear to skate on the surface which again appears very unnatural. Additionally, the drag will create a belly, or large bend, in the line which will make it almost impossible to strike quickly should we get a take. To overcome this tendency for the line to drag it is necessary to "mend" the line, that is to lift the faster moving line gently off the water and flick that part of the line back upstream so that it keeps pace with the slower moving line.
You may have to perform this mending action several times during one cast to keep everything moving smoothly. In fact, it is common practice to cast and immediately mend the line so that the part which will be travelling faster is flicked upstream straight away. This allows the slower moving line to move naturally, while the faster moving line "catches up". Once it has caught up, simply mend the faster moving part of the line back upstream again, so it is always behind the slower part of the line.
In the chapter on casting techniques I have described the way in which a line can be cast with a bend at the end to avoid an obstruction or to get the line into hard to reach places. This casting technique is ideally suited to the floating line and can be used to great effect to present a fly without the fly being shot directly in front of the line itself. This can be useful on both moving and still waters, especially if you are fishing to a rising fish or you have located your prey by stalking and do not want to disturb the water directly in front of it. While casting a line with a bend on it in moving water may sound counter-intuitive, the result can be that you avoid having to mend the line as soon as you have cast it - effectively you put the mend in the line while it was still in the air. This means that you do not have to mend the line immediately it hits the water, which often causes a lot of disturbance as the line is ripped off the water prior to being re-positioned.
Floating lines lend themselves to long trotting. In this technique you fish directly downstream of where you are standing and pay out line as your flies move down with the current. By ensuring that you are directly upstream of your flies you will have a direct line of attack with your flies. If you are using wet flies you can hold them back slightly to make them flutter in the current, but don't try that with a dry as it will make it look unnatural. This method keeps the flies ahead of the line and leader, giving you an advantage because your fly will be the first thing the fish sees. This is all fine but you must remember that the advantages of this technique can be so devastating that it is banned on some rivers. The question is also raised as to whether this is real fly fishing as no casting is involved in this technique.
As mentioned earlier, there is another use for a floating line, and that is to give very precise control of the depth to which the flies sink. On those hot summer afternoons when nothing seems to be happening, the fish will often be found in deep, cool areas grazing on pupae and larvae. These areas could be twenty or more feet down. The initial thought would be to stick out a fast sinking line with a booby or similar fly; but often the fish will refuse this offering as they become obsessed with vacuuming up fly pupae. It would be great if we could get a buzzer down there, but putting that on a sinking line would just see it sink into the bottom of the lake.
In the section on Intermediate Lines we saw that this problem can be addressed by the use of a slow sinking line which is allowed to sink and then slowly retrieved as it falls through the lower part of the water column. While this is a perfectly acceptable solution, it is equally possible to solve the problem with the use of a floating line. The advantage here is that the flies can be moved ultra slowly and left to hover just off the bottom, a technique not available with the intermediate line which would eventually reach bottom.
By carefully measuring the depth of water we can make up a leader of similar length and cast this out on the end of a floating line. It's going to take a minute or two to sink through all that water and when it does get down there it takes a different technique to make it work effectively. Imagine your floating line with a twenty foot leader hanging down from it. A normal retrieve will cause this leader to start rising in the water rather than move through it. This is because the resistance of the water is greater along the length of the leader, so it is easier for the leader to rise through the water than move through it. In order to keep the flies down at the desired depth you will need to keep the rate of retrieve extremely slow.
I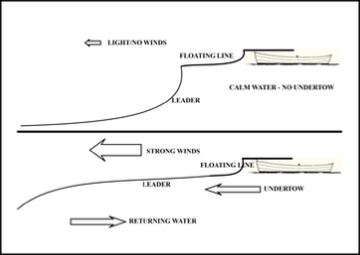 t is also worth remembering that most larger bodies of water will have currents and undertows caused by the wind moving the top layer of water, with the lower layers moving in the opposite direction to make up for this. A leader of the exact length as the depth of water you are attacking may in fact be many feet off the bottom because of this undertow effect. Imagine the huge bow that can develop in a thirty foot leader in these circumstances and you will see the problem. There are two ways to address this problem.
Firstly, obviously, you can make the leader even longer and this is called fishing "over-depth". It's a bit of a hit and miss exercise to get the exact length right to compensate for undertow and the over-depth length may change as the undertow changes in strength. Just keep an eye on the point fly at the end of each retrieve to see if any debris has accumulated in the bend of the hook or slime has been snagged by the point. Even that can be a bit of a trial when using a leader up to three times the length of the rod. You'll need to pull a good deal of the leader through the rod rings to get a good look at your flies. This means that you will need a few roll casts to get all that leader back into the water prior to your next cast. Remember, you can also adjust the depth at which the flies move through the water by adjusting your speed of retrieval. But this is an adjustment which is very subtle. Too fast and you're pulling the flies up through the water column again.
The other way to solve this undertow problem is simply to put a weighted fly on the point or, alternatively, to pinch a split shot on the line just above the point fly. Some waters will be very suspicious of anyone found with split shot in their kit - they tend to equate split shot with coarse fishing techniques, so always inquire if this is a problem on your particular water before using them. Whether you decide to use a weighted fly or a swan shot, this method has the added advantage of getting your flies down through the water much more quickly when you first cast them out. While it may take as much as two minutes or more for a team of unweighted flies to fall through twenty or thirty feet of water, a weighted point fly may get down there in less than a minute.
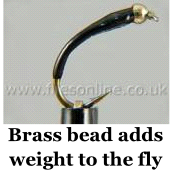 What sort of weighted fly? I have had great success simply putting a brass bead head on a bloodworm buzzer when tying it up. You'll find this explained in the fly tying section on buzzers. Once the weighted fly gets to depth - remember to check at the end of every retrieval for debris - the retrieval should be slightly faster than with an unweighted team to compensate for the extra mass. Incidentally, as you become more adept at this method you may even feel the tiny resistance that is caused by the fly dragging the bottom. Don't despair if you don't get it perfect. You have two other flies that are at depth and working for you. Besides, bloodworms live in the mud so the fish won't be surprised to see one moving slowly across the bottom. Some anglers intentionally let the point fly hit bottom and drag along the ground. This is called sacrificial fly fishing and simply ensures that you have your droppers fishing at the correct depth. Here are two videos demonstrating this method:
An ideal leader length for fishing our favoured littoral zone (ten to twelve feet) is fifteen feet, made up of nine feet to the first dropper, three feet to the middle dropper and finally, another three feet to the point fly. I have used this set up successfully many, many times. The rule of thumb is to fish a leader 1½ times the depth you are fishing. As you pull the line through the water it will rise up because of the water resistance, so you need more leader than the depth to take account of this effect. Here’s a couple of videos I made to demonstrate this set up.
But here’s the problem – what flies to use! And my experience tells me to keep my eyes open! Recently (in May) we had a huge buzzer hatch – those big fat juicy buzzers that you can’t ignore. So, it was pretty obvious what was going on my leader, a gold head buzzer (you’ll have to experiment to see what buzzer works best – for me it was a black buzzer with a silver rib and an orange wing case) went on the point and a similar fly on the middle dropper – but without the gold bead. I put a Diawl Bach on the top dropper – my favourite fly for the top dropper. I netted 33 fish that day! The next visit a few days later the weather had turned cooler and there was no buzzer hatch, but I persevered and caught 14 fish – still a very satisfying day. And a few days later the same set-up resulted in just seven fish, as did the visit on the next day. Obviously, the buzzers weren’t working as well.
The very next day (early June) I went back to my fishery intent on carrying on with the buzzers and fished for a couple of hours with just one fish. No buzzer hatch and it was apparent the fish had forgotten them. Then something in the boat caught my eye. It was a damsel fly that had just crawled into the boat as a nymph and had shucked its skin to become the flying form. It was a lovely shade of green (as it dries it becomes either brown as the female or iridescent blue as the male). I was enthralled by this little animal which crawled on to my finger, so I could get a closer look at it. And then the penny dropped… if this creature was in my boat and lots of others flying around, they all had to have come from the water and, of course, the trout would not miss such an opportunity!
Off with the buzzers and a change of flies. A gold head Diawl Bach on the point, an olive classic FM on the middle dropper and an unweighted Diawl Bach on the top dropper. The results were dramatic and instantaneous! I ended the day with 28 netted fish and another dozen or so escapees (as I use barbless hooks I accept a certain loss rate). The moral to this story is – keep your eyes open and you might be surprised what you see and learn. It’s all about matching the hatch. And here’s two of my videos of this method of fishing nymphs on a floating line.
A note about how to fish this system. We want the flies to stay down in the water, so a slow retrieve is the order of the day. But we can do better than that… I count my flies down in the water and I have found that a count of 30 will put the point fly close to the bottom (less if you find mud on the point fly at the end of the retrieve).
And here is the thing that I find makes all the difference: I don’t just do a slow figure of eight retrieve – I do a single fast figure of eight and then wait for a second or two before doing the next one. This gives the flies the effect of “dancing” through the water. The single figure of eight pulls the flies up an inch or two and the pause allows them to sink again. I continue this motion right through the retrieve until the end of my floating line is a couple of yards from the boat – and then I speed up the figure of eight retrieve to a fast pace. This has the effect of suddenly pulling the flies up through the water column and takes can be violent as the fish grabs the ascending fly.
But there comes a time when the undertow will be just too strong to counteract with over-depth leaders or a weighted fly - then it’s time to move onto a sinking line. Keep your eye on the wind strength to keep in touch with the fish.
There is one line that does not exactly fit the description of being a floating line, but I will introduce it here as it is more floating than anything else. This is the sink tip line. On deep fast flowing rivers, such as the melt-water rivers of mountain areas, it is not possible to use a sinking line because the underwater debris would cause it to snag on virtually every cast. By the same token, a floating line would be ineffective as the speed of the water would cause the line to be washed downstream before the fly has had chance to reach a satisfactory fishing depth. To solve this problem the benefits of both a floating line and a sinking line are combined into one. The first ten feet of this type of line are manufactured to sink quickly, while the rest of the line is made to float. This type of line is identified by the change in colour at the point where it becomes a floating line, changing from dark brown or charcoal to white.
So the front end sinks to a satisfactory fishing level but is then held back from sinking any further by the floating line attached to it. Sink tip lines are primarily used to fish for salmon on big rivers with a double handed rod of fourteen feet or more. There's more about these lines in the chapter on boat fishing. I have used this type of line to great effect in the fast flowing melt-water rivers of Alaska and British Columbia but you are unlikely to need its specialist qualities in normal trout fishing situations. Having said that, it would be interesting to test out your double handed rod - which you probably bought for that once in a lifetime trip like I did - on your home water. There's no law that says you can't have a bit of fun with it!

I mentioned earlier that the object of the exercise in manufacturing lines of different sink rates is to give greater control over the presentation of the fly at a desired depth. The depth at which the fly is fished can be managed by using a floating line and varying the length of leader so that the fly drops to the desired level. Or a fast sinking line can be used with a floating fly and the leader is then used to control the height to which the floating fly is allowed to rise. But the best way to achieve a desired depth is to use a slow sink, or intermediate, line which falls through the water at a pre-determined rate, so you should know exactly what depth the line has sunk to after a given period of time.
For this reason sinking lines are made in a variety of different sink rates, from one inch per second through to six or more inches per second. These lines that sink at a relatively slow rate are known as intermediate lines. There is a blur between where a line ceases to be an intermediate line and becomes a fast sink line. For ease of reference we will say that anything over four and a half inches per second falls into the category of fast sink. Intermediate lines are coloured in light green, light blue or light brown for the slowest sink rates, graduating to darker green or blue or brown for the faster sinking lines. Remember the rule - the darker the colour, the faster the line sinks.
IT'S THE LINE THAT COUNTS!
So how are we going to take full advantage of this carefully manufactured sink rate? The answer is all in the counting! Let's take a typical scenario: The fish are sitting happily in twelve feet of water (we'll work out how you know they may be there in due course) and you want to use a fly that you can fish at a reasonable pace, for instance a leech pattern. Why a leech pattern? Because it's a fly that creates movement in the water which the fish will feel through their lateral lines and hopefully come to investigate.
Using a fast sink line (six inches per second) will mean that we only have twenty four seconds (6 inches [½ foot] per second = 1 foot in 2 seconds = 12 feet in 24 seconds) from the time the line hits the water till the time it hits the bottom and that's not enough time to get the job done properly. Equally, a floating line will need a very slow retrieve rate to keep even a weighted fly down near the bottom, while a non weighted fly may not even get down to the depths, being held up by water currents. Such a slow retrieve rate is fine if we want to use a slow moving fly like a pupa, nymph or buzzer imitation which would naturally move at very slow speeds. But it won't put enough movement in the fly if we want to use something that depends on motion to make it work, such as the leech whose tail will only flutter with reasonable motion.
Now let's try this exercise with an intermediate line - say a sink rate of three inches per second. The first thing to do is a little mental arithmetic. A sink rate of 3 inches per second = 1 foot in 4 seconds, so 12 feet will take 48 seconds. We now have an idea of how long it will take for the line to fall to the bottom. In actual fact, the very act of retrieving will tend to hold the line up in the water and slow the rate at which it falls, so it will take much longer to fall to the bottom than just 48 seconds. If I cast and retrieve immediately I find that the retrieve rate (speed) I want to use to make the fly wriggle gets the fly back long before it has had time to sink all the way near to the bottom area where the fish are feeding and that’s a problem.
The answer? Cast the line out and then sit and do nothing except count at the rate of 1 per second - try 20 seconds - and then start retrieving. Repeat the cast and count to 30 before starting to retrieve. The object of the exercise is to find out how many you have to count before starting to retrieve so that the fly hits bottom just before you have finished retrieving it. You'll either feel the fly dragging the bottom or it will come back with a little bottom slime on it. Clean it up and now cast out and count five less before starting to retrieve. With a 3 inch per second line a count of 5 less is equal to between 1 and 1½ feet, so you'll end up pretty close to the bottom. If it still touches bottom just count 10 less and so on. With a little practice and patience you will soon get the hang of this technique.
Some people find that using a stop watch or the second hand on their wristwatch is effective rather than having to count, whatever works for you is fine. Over the years I have found this counting system to be a consistent and killing method. The great thing is that you can put real movement into your fly and present it at the correct depth. The leech pattern I use has a nice long marabou tail and with a good figure of eight retrieve (explained in the Winter Chapter) this will move through the water as if it was actually swimming - the movement is so realistic. The fish will follow this and sometimes you will even feel them plucking at the tail. If you feel these plucks and tugs don't stop retrieving! The temptation is to stop to give the fish an opportunity to take the fly. Big mistake! Put yourself in the position of the leech or tadpole you are trying to imitate. Would you stop and be eaten? Retrieve faster! Quick we must get away from this monster! And the fish will oblige and chase the fly and take it before it gets away! Job done! The secret is all in the counting.
Here’s a couple of videos I made describing this technique as well as showing how I set up my rod and reel,
Intermediate lines are density compensated. What this means is that the thin end nearest the fly would have a tendency to fall through the water faster because of its thinner profile. This is accounted for in manufacture so that the whole line falls at the same uniform rate. This is especially useful if retrieving with the counting method when it is essential that the whole line acts in a predictable way.
If the fish are sitting in shallower water then use a slower sinking line - for example 1 inch per second - but still use the counting technique. Just remember that you will need to calculate the depth that the line sinks to with a different sink rate. Now you understand why different sink rate lines are manufactured. The intention is to use a line with the right sink rate to get your fly down to the depth you want in a reasonable amount of time. Here's that table again to remind you of the different depths for different lines.
You'll need to interpolate for lines with different sink rates. For example, if your line has a declared sink rate of 2 inches per second then you can easily work out that it will fall 1 foot in 6 seconds (2 inches in 1 second - 12 inches in 6 seconds). Once you've worked that bit out then it stands to reason that it will fall 5 feet in 30 seconds or 10 feet in 60 seconds and so on.
(i.p.s. = inches per second)
Bear in mind these depths are not necessarily the total depth of water but the depth that the fish are sitting at. As an example, you might be sitting in a boat in 20 feet of water but the fish are sitting 12 feet down. It is the twelve feet that we are interested in and that is the depth you will count for. You have to count to get the line down to the fish. But you should start retrieving before the line actually hits the fish's depth or you will retrieve most of the line under the desired depth as it continues to fall while you retrieve. So, in this example I would start retrieving when the line is around eight or nine feet down. This will retrieve the line through the required depth, giving it that irresistible upward swing as it reaches the end of the retrieve while it is still at the correct depth.
How do I know the fish are 12 feet down? I don't for sure without a fish finder - but it's a good starting point. It seems to be a favourite depth for them to hold at when there is nothing else to interest them. Read the piece about daphnia and how they sit at a particular depth depending on light strength. The fish cruise at that same depth vacuuming them up as they go. Daphnia are the trout equivalent of popcorn! Having said this, there is no doubt in my mind that the vast majority of the catchable fish will be at or very near to the bottom and that is where you should concentrate your efforts.
Some people say it's all about the thermocline - that depth at which the cooler water below meets the warmer water above. They say the fish sit at this change in temperature for comfort or because the different temperatures cause different densities of water which create an interface in the water which the fish hide behind. That sounds like very impressive science - but I prefer my idea about daphnia. You make up your own mind. Whatever the reason, when the fish are not feeding in the shallows you're likely to find them sitting at the twelve foot depth in deeper water. Having said all that, I stress again that I catch the vast majority of my fish in ten or twelve feet of water (that’s ten feet to the bottom), so I would only recommend venturing into the deep waters if everything else has failed - perhaps on those rare occasions you’re better off down the pub!
You can see from the table that there are optimum lines for a given depth of water. It doesn't make sense to sit and wait for 2 minutes for a 1½ i.p.s. line to fall through fifteen feet of water and similarly a 6 i.p.s. line will be ineffective in ten feet of water unless you are stripping it back when lure fishing (see the Autumn Chapter for a description of lure fishing). So... match the line to the depth.
There will be times when the fish are sitting very deep - for example when the sun is bright and the weather calm. These conditions allow a great deal of light to enter the water and we are back to the fact that our fish have no eyelids. So down they go. And while they are down there they will probably decide to forage on the bottom for anything that might be edible. What will they find? Probably some bloodworms, buzzers or small nymphs. Load your leader with a team of three flies - a small nymph on the top dropper and a couple of bloodworm or buzzers on the middle dropper and point.
We can now use our intermediate line to attack these fish at depth. Cast out and count till about half way down. This may be as much as a minute - a 3 inch per second line will fall 15 feet according to our chart. If the fish are sitting on the bottom in 30 feet of water you can start retrieving at the half way mark - but retrieve very, very slowly. The act of retrieving will slow the descent rate even further, so you can simulate the slow movement of a bloodworm falling through the water in this fashion. It's a nice easy way to while away a bright summer afternoon which will give you a much higher chance of catching fish than thrashing away in the shallows!
There is an alternative way to fishing the depths. Elsewhere you will have read descriptions of using a floating line and an extra long leader to achieve this result. However, many people prefer using an intermediate line because a floating line with a 20 or 30 foot leader can be very difficult to cast. With an intermediate line you only need to use a short leader - I use about 3 or 4 feet from the fly line to the first dropper, 2 feet to the middle dropper and finally another 2 feet to the point fly. This makes a total length of 8 feet or so, a much easier length to cast. I often dispense with the middle dropper, using just a single dropper and point fly. This makes the leader rig even shorter and more manageable.
Additionally, the whole reason for using an intermediate line is to carefully manage the depth at which you are fishing, so there is no sense in using a very long leader which could allow the flies to be at a completely different depth to the fly line. For the same reason it does not make sense to use a weighted fly when using an intermediate line. You want your leader and fly at the same depth as your fly line and a weighted fly is likely to destroy this symmetry by sinking faster than the fly line.
There are times when the fish will venture into very shallow water to grab their goodies. The sun will be behind heavy cloud or it will already have set to give the fish enough comfort to make this trip. Stealth is essential when approaching fish feeding in shallow water like this, whether you are fishing from a boat or stalking from the bank. A floating line is fine until you want to put some life and motion into your fly. A leech pattern will only work if it is being moved at reasonable speed to get the marabou tail working actively. Equally, a fast sink line will ground out in this shallow water far too quickly. So the ideal answer is an intermediate line with a gentle sink rate of perhaps just an inch a second or so. Cast and start retrieving almost immediately. Try and find some breaks in the weed beds and cast between these beds for optimum action. Sometimes it may be necessary to explore the water to find these weed channels - which will scare the fish away - and then withdraw while the fish return before starting to fish seriously.
Intermediate lines are highly versatile and will enable you to become much more scientific and analytical in your approach to trout fishing. This will also require a deep understanding of where the fish are likely to be and what they are likely to be feeding on at any time. This is what separates the average fisherman from the expert, being able to reason where the fish are and how to best attack them. Wind, light intensity, temperature, time of year, available food items - the list of variables is extensive and then you have to decide what fly, line and location will work. No one said it was going to be easy!
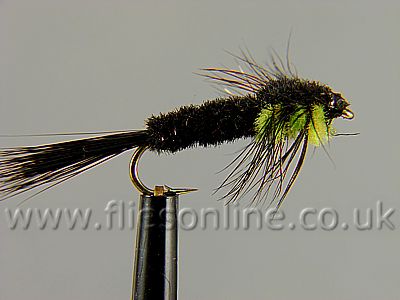
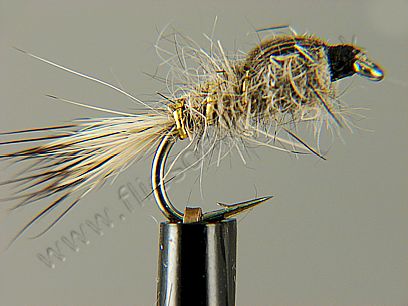
Finally, I’m going to give two very specific examples of how to use an intermediate line, Why? Because so many of these types of books are accused of dealing in generalities to the point of being meaningless. I think a beginner needs all the help available. I recently fished a reservoir where there were probably another 200 people fishing. The weather was fair with a slight southerly wind and occasional cloud. I figured that the fish would be feeding in the 10-12 foot region and searched out that depth - remember the anchor rope and how to use it as a depth measure (in the Boating Section). I set up an intermediate – 3 inches per second – line with three flies. I put a Montana on the point, a Gold Ribbed Hare’s Ear on the middle dropper and an Orange Classic FM on the point. Why these three flies? The Montana emulates a large nymph such as a dragonfly nymph and is used on the point because that fly will be lowest in the water – nearest the bottom – where a fish would expect to find a nymph. The Gold Ribbed Hare’s Ear on the middle dropper represents a larva on its way to the surface to shuck its skin and emerge as a fully formed fly. The Orange Classic FM represents a clump of daphnia which will be found higher in the water column and, hence, is tied onto the top dropper.
I cast out the line and immediately started a figure of eight retrieve. Nothing. A little experimentation showed that if I counted to 15 my point fly would come back with slime or mud on it. It was hitting the bottom. So the count had to be 10 – or no count and a slightly slower retrieve. Either would work in getting the line down but not hitting the bottom. A few more casts and I was into the fish! During a four hour session I bagged 20 fish! Some took the Montana, some the GRHE and others the Orange Classic FM. All three flies worked for different reasons. I was later told that the other 200 anglers had about 100 fish between them – an average of one fish for every two fishermen while I took 20. This is not a boast but a demonstration of how to use the knowledge of where the fish are likely to be and what they are likely to be feeding on. I can’t get more specific in describing the way I fish and why. And here are three pics of the flies I used. I hope this helps!
Montana
Gold Ribbed Hare’s Ear
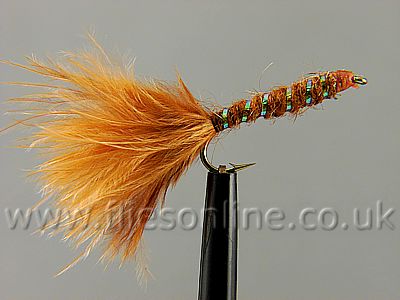
Classic FM Orange
The second example I’ll give you is as much about water craft - knowing what to look for and how to use that information. During the summer months there can be huge sedge hatches. These are the flies that are also called the caddis fly, looking like little moths with two long antennae. Living on the bottom in a self made tube of stones, bits of bark or whatever else that particular type of caddis prefers, the time comes when they pupate and make their way to the surface. The trout know this tasty morsel is about and will search the shallows for the metamorphosed nymph on its upward journey. At that moment it looks very like a gold ribbed hare’s ear - or should it be that the GRHE looks like the caddis - whichever!
The nymph tends to live in shallow water - as little as three or four feet. Anchoring in just six feet of water I used a one inch per second intermediate line with a GRHE on the point and another on the first dropper with an orange Classic FM on the top dropper just to add variety. While the dozen boats near me had about six fish between them I netted twelve fish and lost another four. Again, not a boast, but proof that my system works. In six feet of water my one inch per second line needed a count of twenty to get it through the first few feet of water and I still had time to retrieve it before it hit the bottom. You can’t use a floating line for this type of system because you have to retrieve a floating line slowly if you want to keep your flies down in the water. I find that the trout will not attack a slowly moving fly in these circumstances because they are conditioned to expect these caddis to be moving quite quickly to try and make it to the surface before becoming trout dinner!
 So we come to the express trains of the fly line collection. These lines are made of a dense material bonded to a monofilament or braid core. They are much thinner than other types of fly line as it is easier to make materials that are dense and sink quickly than materials that float or sink at a slow rate. This thinner cross section means that these lines offer less resistance to the air and therefore can be cast greater distances at greater speed. This is a useful feature when fishing in very windy conditions when the line is likely to be blown about.
Fast sink lines are ideally suited for use in deep water with a buoyant fly such as a booby or a razzler. I have been privileged to catch over a dozen double figure trout using these lines and flies. The intention is to attack those fish which are feeding on or very near to the bottom. There really is no other way of keeping a fly so very close to the bottom of the lake or reservoir without the risk of it grounding out or disappearing into the mud and detritus down there. You have great control over the speed of retrieve and some anglers will just leave a buoyant fly on a hi-d line static with no retrieve whatsoever for long periods of time in the hope that they may ambush a passing fish.
The hi-d line and buoyant fly system is an absolute giant killer in the right circumstances. I know of some anglers who use no other technique than this - and with good results, but I think they are missing some of the finer ways of catching dinner, like a fine dry on a lovely summer's evening. As always, it's horses for courses.
The counting system described in the chapter on intermediate lines comes into play with these lines as well, but for a different reason. With an intermediate line the idea is to start the retrieve when the line has fallen to a depth where it can be retrieved in full just before it hits bottom. With a buoyant fly and a fast sink line (sometimes referred to as a high density or hi-d line) the object is to ensure that the fly is as close as possible to the bottom when it is retrieved. The count system here is to ensure that the line has reached bottom before the retrieval starts. Knowing the depth of water and the sink rate makes it easy to ensure that you give enough time for the line to fall to the bottom before you start the retrieval.
The temptation is to then use a nice comfortable figure of eight retrieve (explained in the Winter Chapter) to get the booby moving along close to the bottom of the lake or reservoir. But things are never quite what they seem. While the movement of your fly may well attract a fish, they will often follow it out of curiosity but not take it. We have to do something to induce the fish to seize the fly and there are a couple of things we can do to make the fly more attractive to the fish.
Few creatures that trout feed on will move sedately along the bottom if they know that they are perilously close to their last moments with some monster stalking them. They are more likely to dart and dive to try and avoid their date with destiny. We can make our fly imitate this action. Instead of a continuous and regular figure of eight retrieve try a few seconds of short fast jerks to bring back the line. These fast jerks will often get an immediate result. Always make sure you have a good hold of your rod - some of the takes can be savage! Here is my video showing a hi-d line and booby in operation.
To help put even more realism into the retrieve, here's another idea. There is one time a nymph cannot help but answer the call of nature and that is when it is time for it to leave the water and start its life in the open air. This will involve the nymph in a perilous journey to the surface, but the first movement it makes is when it leaves the bottom and heads for the top. We can simulate this initial upward motion by simply doing nothing! A fast figure of eight retrieve for a few moments should then be followed by a couple of seconds when you stop and do nothing but hold on tight. The fast initial retrieve will drag the booby down close to the bottom. This wait then gives time for the booby to start rising in the water due to its inbuilt buoyancy. It's amazing how effective this stop-start method can be and has bagged me some huge fish. Nothing gets the adrenaline going more than seeing your rod tip suddenly bury itself in the water when you stop retrieving!
I showed this technique to a newcomer I was giving some lessons to. He was retrieving like mad to show off the figure of eight I had just taught him. I told him how impressed I was and then told him to stop and have a rest. As soon as he stopped, his rod was nearly jerked out of his unsuspecting hand as a trout grabbed the booby. A real tussle ensued, which involved the line getting wrapped round the anchor rope and several other adventures, but we eventually landed him a fine eight pound specimen. Not bad for your first ever trout on your first ever trip! And all because he just stopped!
There is another method of fishing where the hi-d line is the tool of choice and that is in the method known as back drifting. A time will come when nothing you have tried has produced any results and you are beginning to think that they must have removed all the fish since your last visit. This can happen on those long hot afternoons when the fish have gone deep and casting a line into forty feet of water is not terribly appealing. The answer is to pull up the anchor and let the breeze move the boat across the water with your hi-d line and booby being dragged through the depths behind it. Bear in mind that this system will only work with a buoyant fly like a booby or razzler.
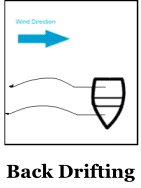 Where you would normally sit in the boat with the wind at your back, here you sit with the wind in your face so that your back is to the direction of travel. Flick your line and booby out and then gently pay out line as the boat moves through the water until you think the line has touched bottom. This will be much more line than you would initially expect as you have to take into account the amount of line needed to make a comfortable angle of travel from the bottom to the top of the water. Then just sit back and relax. The fly will fish itself and the only time you have to bring it back in is when you reach the other side of the reservoir - but keep an eye on where the boat is headed!
A further refinement to this method is to add some droppers to your rig. Normally, this system uses two boobies – one just a few feet from the bottom and the other maybe eight or ten feet above it. The idea is that the bottom booby imitates a slow-moving nymph and the higher booby looks like a clump of daphnia. The bottom booby could be black and green, brown or a similar nymph like colour. The higher booby is usually orange or coral to suggest the hue of the daphnia – I make up a large orange mop fly booby (made from a piece cut from a hand mop used for polishing cars). Use a large booby for the higher fly so that it can support some extra weight. In between the two boobies add an extra couple of droppers. One can be a buzzer and the other can be a gold ribbed hare’s ear – or whatever you think will work. Hey presto – you’re now fishing nymphs and buzzers at depth with ease!
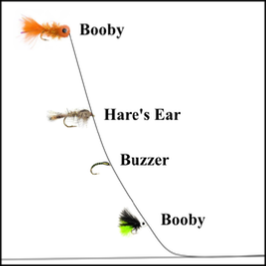
Back drifting boobies with droppers
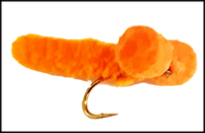
Mop Fly Booby
If, however, you decide that you would prefer some active participation in your fly fishing then you can use the hi-d line in the same way that you would use an intermediate line. There is the added proviso that you must be anchored over very deep water to make the system work. It's a hot summer afternoon and any self respecting trout will have sought the deeps to while away the time before the sun moves off the water and the shallows become inhabitable again. While down there it is likely that the fish will mooch around hoovering up any odd morsels that it comes across.
Surprisingly, some flies prefer to lay their eggs over deep water and the resultant larvae will live in these deep areas. We can put a set of bloodworm or buzzer imitations on the hi-d line and cast them out into this deep water. Remember to pull out a good deal of backing to allow for the depth of water. This extra line will slowly submerge as the line sinks. Without this extra line your flies may never reach the bottom and the system won't work.
Now, let's say the water is forty feet deep. It will take a line rated at six inches per second some eighty seconds to sink to the bottom. But we don't want to allow the flies to just sink into the bottom detritus. So we start retrieving at, say, thirty seconds and, if we get the timing right, the flies will just brush the bottom before starting the upward journey back to the surface. Retrieval must be very slow - bloodworms are not noted for their turn of speed! I remember one old wag who used this system and would comment that his retrieval rate was "about an inch an hour". I think you can actually go a bit faster than that!
Examine the flies for any mud indicating that they hit the bottom and adjust your timing accordingly. Takes may come at any time from the flies reaching the bottom, right up to the surface. I have had many times when the fish have apparently followed the flies right up to the surface and taken one just as I was about to lift off. I liken this to a gathering exercise. The fish may have become interested some forty feet down and that is where I gathered the following fish. But it takes that entire ascent for the fish to decide that it will take the fly.
The natural assumption is that fast sink lines can only be used in deep water. As always, there is an exception to this mantra. When the fish are feeding on fry and I am pulling a lure to imitate an escaping fry fish I will use a hi-d line even in shallow water. The reasons are several. Firstly, a weighted line will keep the fly down in the water, whereas a slow sink or floating line will just make the fly skim along the surface when you really need it several feet down where the action is. Secondly, a weighted line will give you greater casting distance which means you don't need to get too close to the feeding fish and run the risk of spooking them. Finally, a hi-d line can be made into a shooting head which is much easier to use and will give even greater distance. Because lure fishing is not depth sensitive, the use of a line that gives greater distance is an advantage. With many techniques it is essential to have the right depth and retrieval rate every time. That is not the case here.
There is one other type of fast sink line that is unique in its construction. The lead core line is exactly that - a core of lead wire surrounded by a braided sleeve. This sleeve helps to avoid the kinking that this line can suffer from. It is much shorter than a normal line, usually only about twenty feet in length. The lead core is very pliable, prone to tangling and difficult to handle. Why then, you might ask, would anyone want to use such a beast? Well, it really does sink like a stone which is useful in very deep waters.
 The great danger of a lead core line is that you are unlikely to find a rod that is capable of casting it - it falls outside of the AFTM ratings system. You are more likely to end up with a rod in several more pieces than it should be if you try to cast this line repeatedly. If you do acquire such a line then please do NOT try and cast with it. At best you will break your rod and at worst take your own head off! The way it is used is on the drift or under oars where permitted, when it is paid out behind the boat to search the great depths that are required for hunting big browns and lake trout. It's a bit like the back-drifting system where a booby is employed - see the Boating chapter. The difference is that with this technique the amount of line that is paid out is only sufficient to take the fly down to the desired fishing depth rather than all the way to the bottom. It is often used with a big tube fly or similar to imitate an injured fish - a tempting food item to these highly carnivorous creatures.
This type of fishing is called fishing "off the rudder". As the boat drifts an oar, or a purpose made rudder, is used to control the direction of drift in order to follow a particular depth of water. In a strong breeze the speed of drift is likely to force a normal hi-d line up in the water. The great weight of a lead core line counteracts this and keeps the fly down in the deeps where the fish are lurking. Some manufacturers have now introduced an environmentally friendly version of this line made with tungsten instead of lead.
Skagit fly fishing is a popular method of fly fishing that originated in the Skagit River in Washington State, USA. This style of fly fishing typically involves the use of a shorter, heavier fly rod (typically between 10 and 12 feet in length) and a Skagit-style fly line, which is a short, heavy line designed to cast large, heavy flies and sinking tips.
Skagit fly fishing is particularly effective for fishing in rivers with heavy currents and deep pools, where traditional fly fishing methods may not be effective. With Skagit-style fly fishing, the weight of the line helps to load the rod and create the necessary power to make long casts, even in challenging conditions.
One of the key aspects of Skagit-style fly fishing is the use of spey casting techniques. Spey casting involves using both hands to cast the fly line, allowing for longer casts and more precise placement of the fly. This technique is especially useful in tight spaces, such as narrow river canyons or dense brush along the riverbank.
Skagit fly fishing is a versatile method that can be used to catch a variety of fish species, including steelhead, salmon, and trout. It is also a popular style of fly fishing for anglers who prefer to fish with two-handed rods and who enjoy the challenge of casting heavy flies and sinking tips.
There are several types of Skagit fly lines available on the market, each with its own unique characteristics. Here are a few examples:
Airflo Skagit Compact: This Skagit-style fly line features a short, powerful head that is designed for casting large, heavy flies and sinking tips. It is a popular choice among steelhead and salmon anglers.
Rio Skagit Max: This Skagit-style fly line has a short, heavy head that is designed for casting big flies and sinking tips. It is also available in a variety of densities to help anglers adjust to different water conditions.
Scientific Anglers Skagit Extreme: This Skagit-style fly line features a short, aggressive taper that is designed to turn over heavy flies and sinking tips in tight spaces. It is a popular choice for fishing in smaller rivers and streams.
OPST Commando Skagit: This Skagit-style fly line is designed for use with ultra-short, lightweight rods. It features a short, heavy head that is easy to cast and helps anglers deliver flies with accuracy and precision.
Guideline Power Taper: This Skagit-style fly line features a short, heavy head that is designed to load fast-action rods and deliver large, heavy flies and sinking tips. It is a versatile line that can be used in a variety of fishing situations.
These are just a few examples of the many Skagit-style fly lines available on the market. When selecting a Skagit line, it's important to consider factors such as rod length and weight, fishing conditions, and personal casting preferences.
Using a Skagit fly line requires a specific casting technique called Skagit-style casting, which is similar to spey casting. Here are the basic steps for using a Skagit fly line:
Choose the right rod: Skagit-style casting requires a specific type of rod, typically a two-handed rod between 10 and 12 feet in length. Choose a rod that is appropriate for the type of fishing you plan to do and matches the weight rating of your Skagit line.
Attach the line to the backing: Securely attach the Skagit fly line to the backing on your reel.
Attach the leader: Attach a leader to the end of the Skagit line using a loop-to-loop connection or other knot.
Load the rod: Hold the Skagit line and leader in one hand and the rod in the other. Position the line and leader so that the end of the Skagit line is just outside the rod tip. Use a roll cast or other technique to load the rod with energy.
Make the cast: Using Skagit-style casting, make a forward cast by sweeping the rod tip down and out, then bringing it back up and forward. Release the line at the right time to send the fly out to the target area. Practice casting to develop your technique and achieve the desired distance and accuracy.
