KNOTS
BACK TO TABLE OF CONTENTS
There are two ways to get acquainted with your knots for fly fishing - the hard way and the easy way. You don't need to ask which way I prefer! You can spend ages getting into a tangle trying to tie a knot you only half remember - and then see it come undone at the critical moment. No-one likes to see that! So, the answer is to keep it simple. Use the same knot for as many jobs as you possibly can. You won't run the risk of forgetting how to tie it because you'll be using it so often it will become second nature. I only use one or two knots, but for those who like to have a full understanding of knots and what their uses are I have explained a lot more than you will need.
ALBRIGHT KNOT
The purpose of this knot is to join two lines of different thickness, so it is ideal for joining the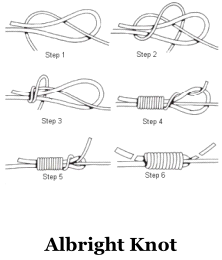 reel end of the fly line to the braid or monofilament backing line. If you are using braid for your backing line then some prefer to use a sleeve with the braid in the same manner as joining the braided loop to the front end of the fly line. It’s all a matter of choice.
You can see from the diagram that this knot might cause quite a lump on your reel if you’re using a thick fly line and there can been times when this lump might snag the rest of the backing line as it comes off the reel. This could be disastrous if a big fish happens to be at the other end of the line! Here’s a video of just how the albright knot is tied.

***
ARBOUR KNOT
Used to secure the backing line to the spool, it is a simple and secure knot. First tie a half hitch in the end of the backing line and ease the knot close to the end of the backing line. Now pass the line once round the drum of the reel and put a half hitch around the long end of the backing line, capturing the drum in the loop you've made. Pull gently on the long end of the backing and it will slip and tighten round the drum. It will be stopped from coming off the drum by the first half hitch you made at the end of the backing line. Two half hitches put on the drum as well will stop the line slipping round the drum. And here’s a quick video for this simple knot.
***
BARREL KNOT
This knot is used to join two lines of similar thickness. It is also called the paragum knot. It is the knot of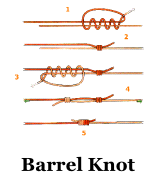 choice for some fishermen to tie droppers into the leader, in which case one of the tag ends is left long to act as the dropper. It is important to ensure that the tag end used is the one pointing away from the rod tip or else it will be ripped off when a fish grabs the fly. Using the correct tag end ensures that the force of the fish is transferred smoothly into the main line. This is the alternative to using a silver ring to make the dropper. Here’s a video to show how it’s made.
***
BLOOD KNOT
Used for joining two pieces of line together, when tied correctly this is a very 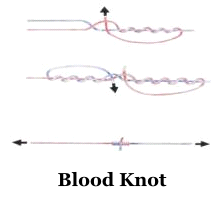 strong knot. Lay the two tag ends against each other from opposite directions for about six inches. Wind one line around the other four times and bring that tag end back through where the turns start. Keeping a loop at that point now wind the other line four times around its counterpart and bring that tag end back through the loop.
Correctly made, the tag ends should be sticking out in opposite directions. Now gently pull the knot tight and remember to lubricate the knot with a little spittle before you tighten it all the way. After trimming off the tag ends this is a neat and efficient knot. It is ideal for joining two lengths of line of similar diameter, as when making up a leader and using progressively thinner line. However, a large difference in the thickness of the lines and this knot will fail to perform. Silver rings make this knot redundant! Here’s the video to show how it’s done.
***
DAVY KNOT
This is a knot developed by Davy Wotton in the 1950’s. Very simple to tie with a good knot strength, it can be tied single or double – some say the single is stronger as it doesn’t bite into the line like the double… but it’s up to you! The illustration shows the single version - the double version is in the video.
***
FIGURE OF 8 KNOT
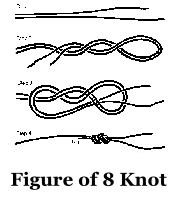 The figure of 8 knot shown in the following video makes a great deal of sense for making loop connections, tying dry fly leaders and for tying on droppers. Now, you’ll have to excuse me, but I think this is exactly the same knot that appears further on and called the Seaguar knot. Whose knot it is and who can claim ownership matters little. It’s a great knot and I heartily recommend it! I include both versions to avoid confusion.
***
GRINNER KNOT
Also known as the universal knot, the advantage of this knot is that it tightens against itself rather than the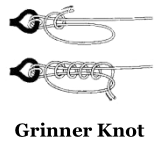 eye of the hook. This means that the fly is left loose in a small loop of line and so moves much more freely. The downside is that the knot can be quite difficult to tie in adverse conditions. You can see from the diagram that the knot requires that the line is looped around itself and through a loop several times. This can be very fiddly without a good deal of practice. Here’s the demonstration video.
***
NAIL KNOT
The idea of this knot is to overcome the failings of the needle knot by not using a needle! And if that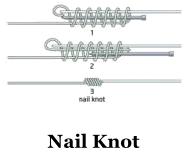 sounds a little odd, then it probably is. Instead of making a hole up the fly line and threading the backing line through it, the backing line is simply laid up against the fly line as if it had been threaded. This is most easily achieved by laying a nail or similar item against the fly line to act as a guide. The backing is then turned back on itself and three or four turns are formed over it. The line is threaded back through the loops that have been formed and then pulled tight.
The simplicity of this knot hides its inherent weakness. Under stress there is nothing to stop this knot simply sliding off the fly line, especially if the fly line is of the coated variety when the coating may part from the nylon core. While no knot is perfect it is another reason why a collar and superglue are the best answer to this problem. Here’s the video to show how the nail knot is tied.
***
NEEDLE KNOT
This knot is used to attach the backing line to the main fly line. The idea is to use a large needle to make a hole up the end of the fly line for an inch or so and thread the backing line through this hole and out the side of the fly line. The backing line is then secured with three turns and the tag end is caught by these turns and held in place. Some people recommend heating the needle with a match when it is in the line to seal the inside of the hole.
The downside of this knot is that it difficult to execute, especially at the waterside when conditions may not be ideal. It also severely weakens the fly line at the very point where it needs maximum strength - the point of attachment. The new generation of fly lines with a coating surrounding a core does not lend itself to this knot, where the hole in the line may only pierce the coating, leaving the knot dangerously weak. For these reasons this knot has been superseded by the use of collars with superglue.
Having said that, some dry fly fishermen swear by this method to attach the butt leader as it helps in a smooth turn-over of the leader by eliminating the “hinge” effect caused by other methods and is easier to pull through the rod guides when using a very long leader. More about this in the chapter on Leaders. It also eliminates the splash that would be caused by a loop landing on the water and again when it is lifted off.
***
ORVIS KNOT
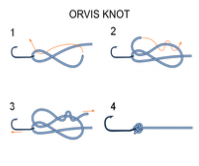
As its name implies, this knot was originally sponsored by Orvis in a competition to find the strongest fishing knots. This knot was the winner, invented by Larry Becker. It can be used as a hook knot or as a dropper knot.
The idea is to create a figure of eight in the line and then pass the tag end twice round the loop created.
***
PERFECTION LOOP
A loop is only as good as the knot that makes it - and the perfection loop is made with a knot that has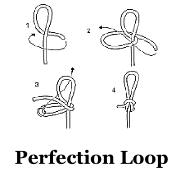 inherent strength because it spreads the pressure over its length and there are no pinch points. It is used to form the loop that attaches the tapered leader to the tippet; in fact, its strength makes it the loop of choice for every situation where a loop is the order of the day.
***
RAPALA KNOT
This knot is used to attach the fly to the leader but leaves a small loo p of line for the hook to move freely. This is useful when fishing with a booby, for example, where you need maximum movement of the fly. You must make an overhand knot in the line before passing it through the hook eye. The end of the line then passes back through that overhand knot, is wound round the main line three times, passes through the overhand loop again and finally back through the loop you have just made by passing it through the overhand loop the second time.
***
SEAGUAR KNOT
This knot is named after a leading manufacturer of fluorocarbon line, which gives an indication of its use.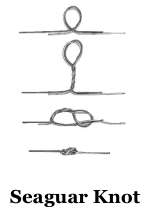 It is a very simple knot and can be employed for tying two lengths of line of unequal thickness as well as tying up leaders. When used to make droppers the tag end pointing away from the rod tip is left long and used as the dropper. A lot of heat is generated when the ends are drawn together and tightened, so it essential that the knot is well lubricated - usually with spittle - before pulling everything tight. You must ensure that you hold all four ends and pull them all at the same time or the knot will fail to form properly and you will be left with a small loop at one end which will severely weaken the performance of this knot.
***
SURGEON’S KNOT
This is a simple knot and is primarily used to attach the short piece of line to your leader so that a droppe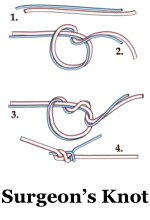 r - second or third fly - can be attached to the leader. In the section on leaders I recommended the use of small silver rings to attach these droppers, but you may not be able to get hold of them or simply prefer to use a knot instead. In that case the surgeon’s knot is for you. Just put the two pieces of line together and tie in two half hitches. Snug the knot tight after applying a little spit to lubricate the lines. Cut off the tag end, which must be the end pointing up the line or else the fish will rip off the dropper when it grabs your fly. The danger with this knot is that it has reduced strength when compared to other knots such as the figure of 8 knot so use it with caution! This video includes a demonstration of the surgeon’s knot.
***
TUCKED BLOOD KNOT
Also known as the Improved Clinch knot this is the Jack of all Trades knot, suitable for nearly ever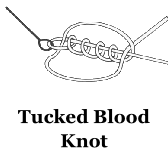 y occasion. It can be used to attach the hook to the line and also to make up leaders using the silver rings I am so fond of. While it is a simple knot to tie, there is one caveat that you should bear in mind. When a knot is pulled tight at the final stage, a great deal of heat is generated through the friction of the pieces of line coming together. This can have a disastrous consequence in that the line can become so hot that it is fatally weakened and will fail at the first sign of stress. To avoid this, the line should be wet when the knot is tied. The easiest way to solve this problem is to simply dab a little saliva onto the line immediately before it is pulled tight.
Some people use the simple blood knot, which turns the tag end through the original loop and leaves the end pointing towards the hook. Some put a second tuck in the knot by carrying the tag end back up through the second loop that is formed. This is called a tucked blood knot and is much more secure. There is a chance that a fine or ultra smooth line can slip with a simple blood knot, but that risk is eliminated with the extra turn in a tucked blood knot. For that reason, the tucked blood knot has always been my knot of choice. When you have tied your knot and snugged it together with a spot of spit, give it a good strong pull to make sure it is correctly made. It's better for the knot to fail when you test it rather than when a fish tests it! The following video includes a demonstration of this knot.
***
WATER KNOT
This knot is also used for attaching two lengths of line. The difference is that with a blood knot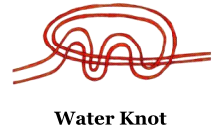 the tag ends stick out from the knot like bristles. With a water knot the tag ends lie down against the line. This indicates the major use for this knot - making droppers. With a blood knot you only work with the ends of the two lines. With a water knot you will be using the end of one line and the whole length of the other line.
Place the two lines together and overlapped for about six inches. Form a loop with both lines and pass both lines through this loop four times. You can see that this will entail the whole of one of the lines passing through this loop. Now simply pull the knot gently, making sure that it is lubricated with a little spittle. Snip off the tag end pointing towards the rod tip and the other tag end becomes your dropper. It is important to make sure that your snip off the correct end. Using the tag end that points towards rod tip would mean that it is emerging from the knot at the top and then folding back on itself to hang down as a dropper. The first take will simply rip it off the leader.
Because the tag end lies against the line any sudden pull is more readily transmitted up the main line. With a blood knot that sudden pull would cause a shearing force in the line because it is at right angles to the main line. This would inevitably lead to the dropper being ripped off. Having said that, it is obvious that all those problems can again be resolved with the use of a small silver ring to create your dropper. At the risk of being repetitive, those small silver rings really do solve a lot of problems. They can join two lines of different thickness without the risks inherent in a blood knot and they can create a dropper without the risks inherent in a water knot. Nevertheless, here’s the video demonstrating the water knot.
***
BRAIDED SLEEVES AND LOOPS
The advance of science has made securing lines together a much easier task. Where previously we had to rely on knots that were difficult to tie and uncertain in performance, we can now use a dab of science to solve the problem. That dab of science is called superglue! It can be used at both ends of the fly line, to attach the backing and to attach the leader. A plastic sleeve is used to sit over the joint and is superglued in place.
To attach the fly line to the backing line is an easy task if you have chosen to use a braided backing as I have suggested. Simply slide a plastic sleeve onto the braided backing and slide your fly line up the middle of the braided backing line for about two inches. This may entail gently loosening the braiding to expose its hollow nature and then worming it over the fly line a little at a time. The idea is to get about two inches or so of the fly line inside the braid. When you have done this you may find that you have a lot of loose ends where the braid has unravelled. Bend the fly line out of the way and snip these loose ends off with your scissors to make a clean point where the two lines meet.
Put a drop of superglue around the joint where the braided backing finishes and the fly line is exposed. Gently slide the plastic sleeve down so that it covers the join and the superglue will hold it in place. I also put a very small drop of superglue on the braid where the fly line is inside as an added precaution. Not too much or it will stiffen the line for several inches which will cause it to adopt a permanent loop once it has been on the reel.
Getting the sleeve on to the braided backing is one of those tasks which is impossible unless you know the secret! Just slide a short length of monofilament through the sleeve, loop the mono and thread it back through the sleeve again. Now put the end of the braided backing through the loop of the mono and pull the two ends of the mono together back through the sleeve. The braided backing will follow it through.
Now for a word of caution: Many fly lines are constructed of a monofilament core to which is bonded the material that gives the line its correct density. This two part approach can have an inherent disadvantage. It is not unknown, under some circumstances, for this bonding process to fail. This is most likely to occur where extreme stress is being applied to the line, as happens at the point where the braided sleeve is attached to the fly line. This danger is especially likely in shooting heads where the whole line and a short length of the backing is being cast.
I have had several occasions where a fine cast resulted in the fly line disappearing into the middle distance as the main line detached itself from the backing line, never to be seen again. This danger can be reduced by stripping a short length of the outer coating from the fly line to reveal the inner core. The braided backing is then attached to this core as well as a length of the coated line, ensuring that the plastic sleeve is superglued to both the core and the outer coating.
Here is a fine video by Hywel Morgan which shows his take on putting together a fly line, leader and braided loop. I referred to this previously, but it’s so good it’s worth looking at again!
BACK TO TOP
TABLE OF CONTENTS
