FLY REELS
BACK TO TABLE OF CONTENTS
Fly fishing reels are unlike coarse and sea fishing reels in that they are not actively involved in the normal fishing process. By the very nature of the sport the reel is not used to cast the line. This is done by the angler, the line having been previously stripped from the reel in preparation. This means the fly fishing reel is effectively relegated to the job of a line carrier. There is one exception to this statement - the playing of a fish can be done with the use of the reel, its drag system operating to help tire the fish.
 My personal preference over many years has been to play the fish by hand. This means the line is left off the reel and the fish is given line manually as it runs and the line is then retrieved by hand and allowed to fall to the ground, into the line tray or the bottom of the boat. I have seen many fishermen reeling in like crazy when they get a fish on the hook to take up the excess line, giving their prey time to slip the hook and get away. You can't concentrate on reeling in the excess line and play the fish at the same time. Playing the fish by hand means that you are in control from the start. But it takes a certain amount of bravery and experience to let the fish have its head in the initial stages of the fight and give it line manually.
You can allow the line to slip through your fingers under slight pressure which acts as a brake and tires the fish. There is a risk that the line lying on the ground will tangle when the fish takes line on its next run, but this is a risk that can be managed if you are aware of it. Simply keep an eye on the loose line while you play the fish and don't step on it! All this gives a much greater sense of satisfaction when besting your prey.
The rare times I had to resort to using the reel and its mechanical drag system was if I encountered a very large fish that took all the stripped line and kept on going! Even in those circumstances no time was wasted reeling in excess line - the fish had taken it all out! I found that a fish running straight at me can be kept in contact with better by stripping the line back by hand rather than trying to wind like fury and play the fish as well. There is nothing more disappointing than fishing all day only to have your one take slip the hook because you couldn't keep in touch with it when it ran towards you faster than you could reel!
 As with most things, you get what you pay for. A cheap plastic reel will do the job of carrying the line but is likely to crack after being knocked about a few times. Equally, you could pay a small fortune for a reel made from an exotic material which will impress the other anglers a lot more than it will impress the fish! However, expensive reels tend to be sturdier and are equipped with superior drag systems and if you are intent on playing your fish with the assistance of your reel then it makes sense to buy the best drag system you can afford. You pay your money and you take your choice!
Whatever reel you choose it is important to make sure the reel is rated to match the rest of your kit. It has to be big enough to accommodate the line rated for your rod. Essentially that means a higher AFTM (see the chapter about Rods for an explanation of the AFTM system) rating will result in a larger reel to fit the line onto it together with the necessary backing line. Backing line is essential and we'll discuss that next.
A normal fly line is ninety feet long - except shooting heads which are about thirty feet. While this length is sufficient to cast the fly a good distance, if a fish takes your fly at the full extent of the cast then it stands to reason that you will need extra line to play the fish if it runs away from you. In addition, on a good day you may be able to cast all of your fly line and a bit more. So there has to be a bit more to cast! That extra line is the backing line, which is attached to your fly line to create an overall length of as much as several hundred yards. The ideal length of line and backing will bring the fly line up to the lip of the reel spool. The backing line is first installed on the spool and then the fly line follows. We'll return to this in a moment, but first let's discuss the types of reels available. This video shows the manufacturing process involved in making a fly reel.

A reel's primary function is to keep a straight line on a round drum... you see the problem? The material that fly lines are made of tends to retain this coiling when it is pulled off the real. This is called line memory. Reel manufacturers identified this problem and came up with a reasonable solution. The wider the reel drum can be, the fewer turns it will take to store the line, resulting in fewer coils. And that is the essence of a large arbour reel - arbour is merely a fancy name for the drum that the line is wound around.
If you do nothing else I suggest, at least take my advice and buy a large arbour reel. It will make a great deal of difference to how your lines survive and behave in use. At the start of each day's fishing you should pull the line off the reel and stretch it gently to eliminate the line memory. You will find it performs much better for this treatment. A gentle stretch is all that's needed. Do this gentle stretch by hand - not by standing on one end and pulling the other! That will only embed grit into the line from the bottom of your shoe. And stretching it too much will crack the coating that makes up the outer layer of the line. Gentle really is the operative word!
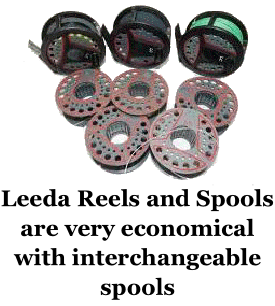 Another important feature to look out for is spool interchangeability. In this type of reel the line is held on a spool that can be removed from the rest of the reel (sometimes referred to as a cartridge) so that a different spool with a different line can be easily installed onto the reel as circumstances change. You may wish to change from a fast sink line to an intermediate line during the day and this cartridge system will make this a quicker and easier job. Of course, the perfect answer would be to have a second rod, reel and line set up so that you can put one rod down and start fishing with the other straight away. But an interchangeable spool is an awful lot cheaper when you are starting out.
While we're talking about interchangeability, you should make sure you buy a reel that suits your "handedness". Better quality reels can be changed to right or left hand use. Some left handed anglers find it very frustrating to have to wind backwards all the time because the reel they have purchased does not have this feature.
 As mentioned earlier, expensive drag systems are superior to cheap ones - if you are going to use them in the first place. The cheapest reels have a ratchet and spring mechanism to act as a brake and this is pretty rudimentary with very little adjustment. More expensive reels will have more complex drag systems with various methods of braking, including Teflon or ceramic inserts. The most expensive reels have internal ball races for smooth action, are counterbalanced to avoid reel shake under fast running and some now offer a gearing system that gives faster line retrieval. Some even have a drag system which incorporates magnets made of rare earth elements. Always remember to set your drag at close to minimum when starting to fish. You can tighten it as necessary when playing a fish. Leave it too tight and the fish will break the leader as the clutch snatches on the first run, and nobody likes to see that! Some reels have an intentionally exposed outer rim so that you can use your finger as an extra brake by applying pressure to it as it spins.
The weight of a reel is another factor to take into account when deciding on your purchase. It should sit well on the rod and create a balanced set up. Balance means that the rod and reel together will have a centre of gravity at or very near to the place where you hold the rod while using it. This is easily checked by setting up the rod and attaching the reel and then trying to balance the rod and reel on your outstretched finger. If the centre of balance is too far away from the place where you hold the rod while fishing then you will be constantly using energy just to hold the rod while it tries to tip forward or backward in your hand. This will also dramatically affect the way the rod reacts while trying to cast, as the rod will have a preference to move in the direction where it has most of its weight concentrated. The perfect set up will simply pivot around your hand with no intervention from the weight of the rod and reel.
 Ideally, you should buy your rod first and take it with you when purchasing your reel to ensure that everything fits together and feels comfortable. If the reel is too heavy it will be more difficult to cast and be more tiring in use. The weight problem is overcome by using plastics in less expensive models and exotic metals such as aluminium or titanium in the higher priced items. All reels should state their maximum line capacity. This is normally expressed as a particular size (AFTM) of floating line with a certain length of backing. This is because floating lines are the bulkiest and will take up the most space on a reel. Any other line with a similar AFTM rating will be appropriate for the reel. So if the reel is rated for an AFTM WF 7 Floating line with 60 yards of backing, you can equally use any other AFTM 7 line on it but you will have to adjust the amount of backing to fill the spool.
SETTING UP YOUR REEL
There are several types of backing line available, including monofilament and braided lines. For normal use I would recommend a thirty pound breaking strain braided backing line which will suffer little from coiling (line memory) and is more comfortable to hold under the pressure of a fighting fish. So, having invested in your large arbour reel and purchased your line to go on it, how much backing do you put on before you install the main fly line? Well, that's a matter of experimentation. This is best done in the comfort of your own home rather than on the river bank or the fishing lodge car park.
The best way is to wind your fly line onto the reel first and then wind on as much backing as is needed to fill the reel up to the lip without spilling off. Cut the backing line at that point and remove it and the fly line from the reel. It is easiest to wind the line onto another reel rather than onto the floor - which is an invitation for it to form a bird's nest. You can purchase a line winder that will hold the line as described below. Now simply reinstall it all the right way round, the backing line followed by the fly line. Never wind the line on to a reel the way you would wind thread onto a cotton reel. That will put a twist in the line for each revolution you wind on. Those twists will become apparent when you are fishing and cause your flies to spin in the water - very unrealistic! It will also kink the backing line and stop it flying smoothly through the rod rings.
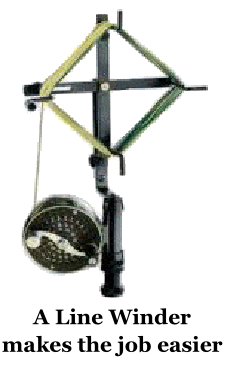 The set-up procedure can be made easier if you invest in a line winder. This device has a bar for mounting your reel and opposite is a large drum for winding on the line and backing. The fly line is initially wound onto the reel. Make sure it's the right end of the fly line - there should be a small tag on the line which tells you which end should be wound on first. Without tying anything together at this stage, the backing line is also wound on until it has filled the reel. Now cut the backing off its spool and wind it off the reel and onto the large drum of the line winder, followed by the fly line, which sits on a separate part of the line winder’s drum. You now have an empty reel and the backing and fly line on the line winder drums. Now reverse the process, tying the backing line to the reel drum. When the backing line is on the reel, attach the fly line to the backing with the relevant knot (see below) and wind the fly line onto your reel. Job done!
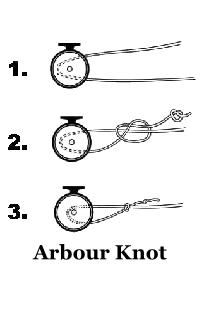 Make sure you secure the backing line to the reel - just winding it on will lead to a disaster one day when the whole lot gets taken by the fish of a lifetime! Use an arbour knot - see the chapter on knots for other ideas. To help you save time looking, an arbour knot is very simple. First tie a half hitch (overhand knot) in the end of the backing line and ease the knot close to the end of the backing line. Now pass the line once round the drum of the reel and put a half hitch (another overhand knot) using three turns around the long end of the backing line, capturing the drum in the loop you've made. Now pull gently on the long end of the backing and it will slip and tighten round the drum. It will be stopped from coming off the drum by the first half hitch you made at the end. This will hold the backing line securely - but the line will have a tendency to slip round the drum. The easy way to fix this is to take the backing line and slip a couple of half hitches onto the drum and pull them snug. That will do the trick. Now reel the backing line onto the arbour/reel drum.
 There are several ways of attaching the backing line to the fly line, including exotic knots like nail-less nail knots or by whipping them together. This is fine for the experienced master class but we want to go fishing! And the answer to that problem is a plastic sleeve. Simply slide the sleeve onto the braided backing (see the chapter on knots) and slide your fly line up the middle of the braided backing line for about two inches. Gently slide the sleeve down so that it covers the join and super glue it in place.
This video from Scientific Anglers shows how they suggest you set up your backing, line and leader - well worth a look.
Another way of securing the backing around the drum of the reel is shown in this video - you choose which way suits you.
Braided loops are available from any tackle shop and are a foolproof way of putting a loop onto the business end of your fly line, so that you can attach your leader. These are also discussed in detail in the chapter on knots. Please make sure you use the right end of the fly line - it does make a difference! Look for the end which should have a small sticker on it saying "reel end". All lines are thicker in different sections so it is really important to make sure you install it the right way round on the reel.
Here is a fine video by Hywel Morgan which shows his take on putting together a fly line, leader and braided loop.
As mentioned earlier, when installing a line onto a reel the temptation is to let the line slip off the original spool as you would a reel of thread. This will put twists in the line and cause it to kink. To avoid this ensure that the spool the line is coming from is set up to spin on a spindle - a pencil or similar will do - and allow the line to unwind rather than slip off the edge. This is easier to achieve with the help of a friend holding the spool for you. While the line winder solves this problem, you'll only use it once or twice a year so decide for yourself if it's worth the outlay. Many fishing tackle shops will install the line for you if you ask nicely. Other shops may make a small charge for this service. The right way to install your line is so that you wind forward to retrieve it. This puts the line at the lower edge of the reel in use, giving it plenty of room to move up to the stripping ring without slapping against the rod.
All reels deserve regular care and maintenance. Make sure they are clean and dry at the end of the day's fishing. While some have enclosed gear systems that are self lubricating, most will appreciate the odd spot of light oil to keep things moving freely. But take care to avoid spilling any oil onto the clutch mechanism - or it will let you down when you most need it!
With use, lines will always tend to twist. This can be caused by some flies which may spin as they are retrieved. You will notice this twisting when you lift a fly off the water and see it spin as it untwists the last few feet of leader. If this problem is not addressed, over time it will cause the leader and line to weaken and the twisting may become permanent, interfering with the casting qualities of the line. To solve this problem, when out in a boat and where it is safe to do so, let your line and backing slowly pay out as you motor or row the boat at medium speed. No fly should be attached to the leader. It shouldn't be necessary for me to tell you to avoid getting the line wrapped round the boat's propeller!
